Level Text and Image
The element Sidebar has been specialized in Paligo to serve both as a separate component (called floating sidebar) and as a general-purpose reuse wrapper element, see Create an Informal Topic. Find out more about Supported Elements.
If you divide a sidebar in two columns, it is possible to level text and image for your PDF output. This can be used for step by step instruction, where the numbered steps needs to include an image.
 |
The default setting for a sidebar is one column with gray background, black frame and the text above the image.
By adding a role attribute that divides the sidebar in two columns, the image and text inside it, will be leveled with one another for PDF output. The role attribute will remove the frame, background color and divide the sidebar in two equally sized columns. There is no option to individually adjust the column width. Therefore it is necessary to adapt the text amount with the image size. If the text amount exceeds the image height, it will flow over to the image column. You need to add one sidebar for each text and image pair.

To the left the default sidebar setting. To the right a two column sidebar.
Note
To make this work in HTML output, you have to assign the sidebar a role, like "sidebar-css" and target that role with your CSS. Make sure to enable the role attribute as "class name" in the layout for the HTML / HTML5 configuration. Learn more about Role Attribute Values.
This example code will give the text 75 % of the sidebar width.
.sidebar-css {
  padding: 6pt;
  width: 75%;
  display: flex;
}
The instruction below shows how to level text and image for PDF output.
-
Select the topic or component in the Content Manager to open it in the Editor.
Alternatively, you can Create a Topic and edit that.
-
Place the cursor where the
sidebarelement is to be inserted in the topic. -
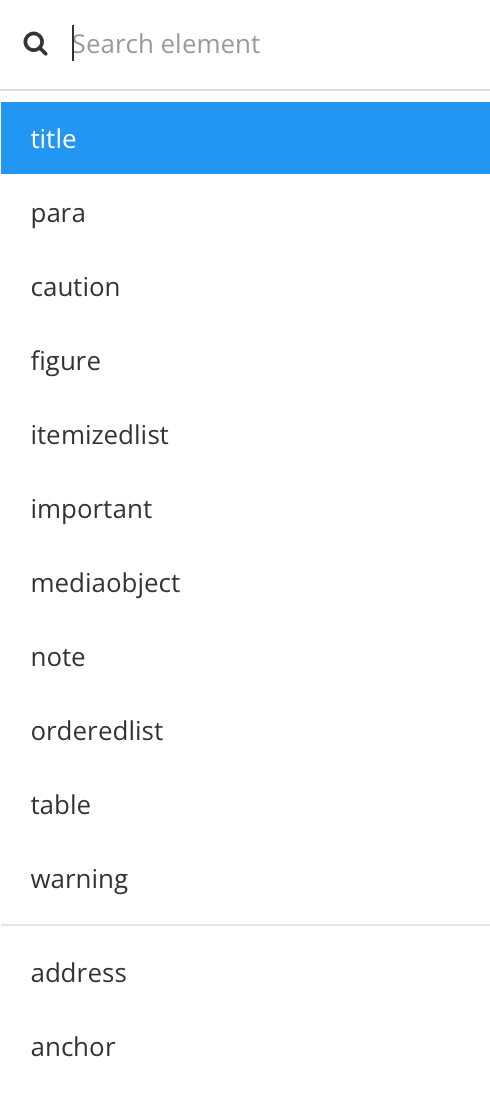
Press Alt + Enter ⏎ (Windows) or Command ⌘ + Enter ⏎ (Mac) to display the Element Context Menu.
-
Enter
sidebarand select it from the menu. -
Add a
title(optional), aparaand amediaobjectby using the Element Context Menu. -
Select the
sidebarin the Element Structure Menu below the toolbar.
-
Select Go to element.
-
Add the attribute
roleto the sidebar element.
-
Enter the value column-count: 2; column-gap: 10pt.
This results in two columns with 10 pt space between them.
-
Select Save.

Note
You have to publish the topic to be able to see the result.
To level text and image in a step by step instruction, you can use sidebars with ordered lists for your PDF output.
Let each step be represented by a new sidebar, because if you have several steps in the same sidebar, you will only be able to level one image.
 |
-
Add a Two Column Sidebar for each step.
-
Select the
parainside the first sidebar. -
Select Ordered list in the toolbar.


-
Repeat for all sidebars in the step by step instruction.
-
Select the
orderedlistin the Element Structure Menu for the sidebars representing step 2 and forward.
-
Add the element attribute
Continuation. -
Set the value to
Continues.
This results in sidebars with a continued numbering.
-
Select Save.
Note
You have to publish the topic to be able to see the correct numbering.