Topics
A topic is a container for your content and building blocks for your output. You create content inside a topic by adding elements for paragraphs, images, procedures, bullet lists, tables and more. You can add as many block elements and inline elements as you need, but the maximum permitted size for a topic is 1 MB.
Instead of writing all sections in one large file, you write each section in a separate topic. For best practice, each topic should focus on one subject or task.
To create the output, you assemble a collection of topic references
in Publications. The topics are your building blocks that you can choose to include or exclude from as many different publications as you like. This is why topics are so important for About Reusing Content. They allow you to use the same piece of information in many different publications, without having to create copies of it. There is one "single source of truth".


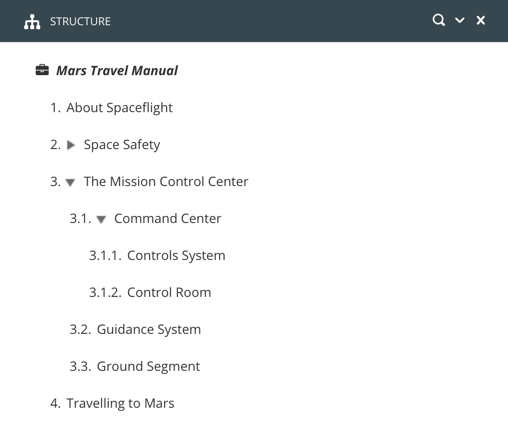
To the left a topic called "The mission control center". To the right the same topic included in a publication.
Tip
To create quizzes, see Quiz Topic.
The Paligo Editor is made to be as easy to use as possible, more or less like a word processor, but it is an XML editor. Although Paligo does not clutter the interface with lots of XML tags, there is still a strict structure underneath the surface. If you have not authored in a structured environment before, you need to at least get used to the basic concepts of adding and using Elements and Attributes, see Quick Start.
Add commonly used elements with the Edit and Insert tabs in the Toolbar or add elements by using the Element Context Menu.
 |
To learn more about the various parts of the Editor, see Editor.
In-context editing
Sometimes you may be working on topics in a specific publication (for example for a certain product) and may prefer to be able to browse it in context while editing the various topics.
You can do that, and do simple editing, in the Contributor Editor. While mainly intended for Reviewers and Contributors, Authors also have access to it of course. And it provides a very convenient way to browse and edit content in context.
The following procedure shows you the basic concept:
-
In the Content Manager, open a topic in one of the following ways:
-
Click on the topic name to display it in the Editor.
-
Select Open in editor in the dotted menu (...) of the topic.
-
-
By default, you get a
title(same as the topic name) and an empty paragraph (paraelement) to start with.In most cases you should only have one title or heading in a topic, see Headings and Subheadings . Subheadings are created automatically when you build your publication in the Structure View.
-
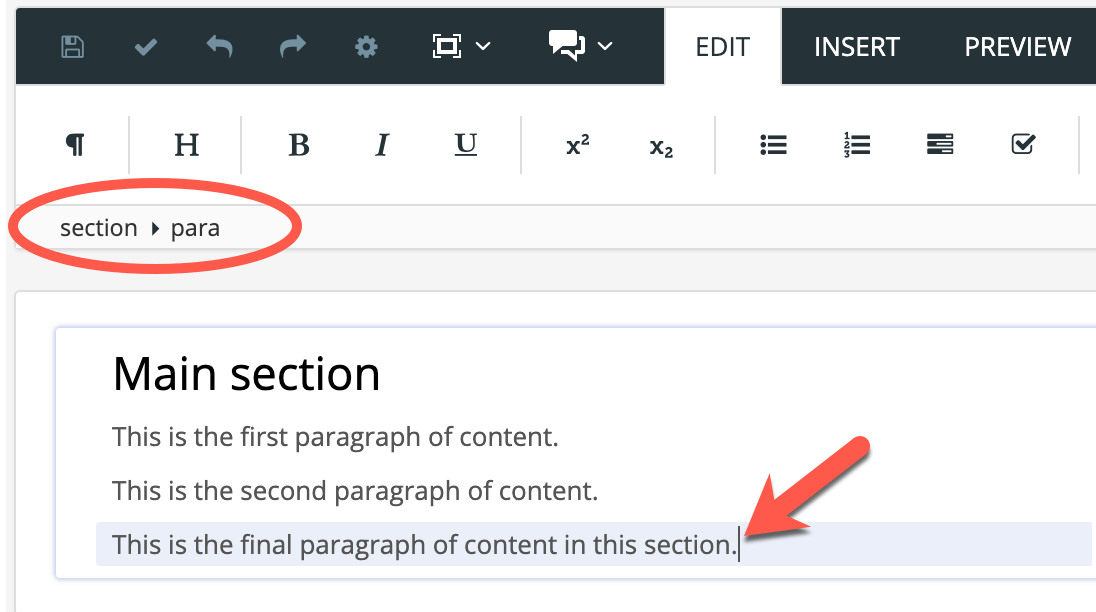
In the Editor, place the cursor where you want to insert an element and do one of the following:
-
Use the Toolbar to insert the type of content (element) you want.

-
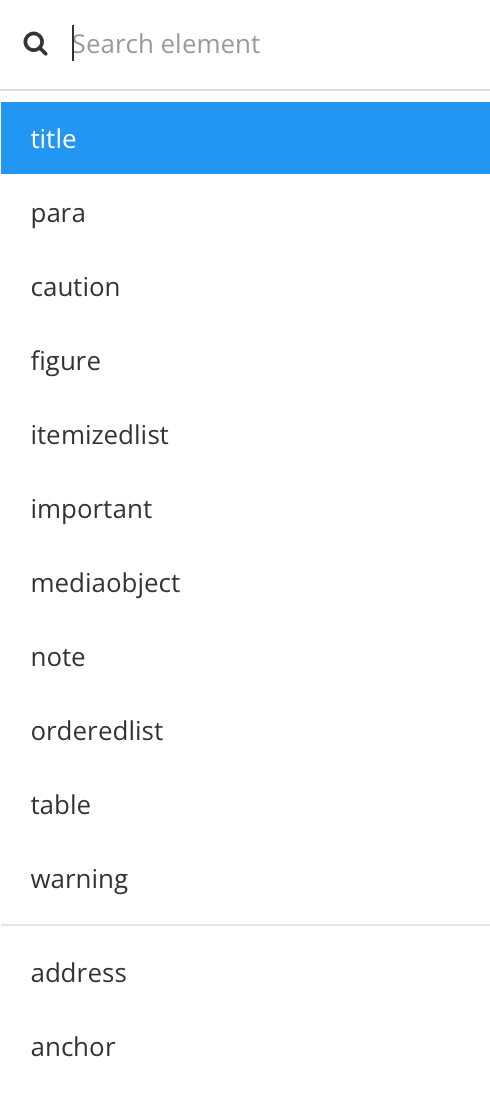
It shows available elements at current position. Start typing to narrow down the list. For example if you type "par" you will see the element
para
-
-
To add a new element of the same kind that you just inserted (for example
para,listitemorstepin aprocedure) just press Enter.Tip
See Keyboard Shortcuts for more tips on speeding up your authoring in the editor.
-
To remove an element:
-
Place the cursor in the element you want to remove.
-
The Element Structure Menu (also called "breadcrumbs") below the Toolbar, shows hierarchic in which element you are. Place the cursor over the element name you want to remove and click to open a pop-up-menu.

-
Place the cursor (without clicking) over the Delete menu option to highlight the element to be removed with yellow background and text that is crossed with red bars.
-
Click Delete to remove the selected element.
-
-
Use the Element Structure Menu in a similar way to manipulate your content with full control, for example:
-
Highlight elements in the Editor.
-
Cut, copy and paste elements.
-
Move elements up and down (needs to be elements on the same level in the structure).

Tip
To split an element (for example a
paraorstep) in two separate elements, position the cursor inside the element and press Enter, see Split a List.If you have used the bold or italic elements to format text, and you want to change it, see Remove Emphasis.
-
Whenever you open a topic or the Structure View for editing, it is automatically checked out. This means you have locked it and other users cannot edit it. This helps avoid conflicts, where two users simultaneously try to change each other's work.
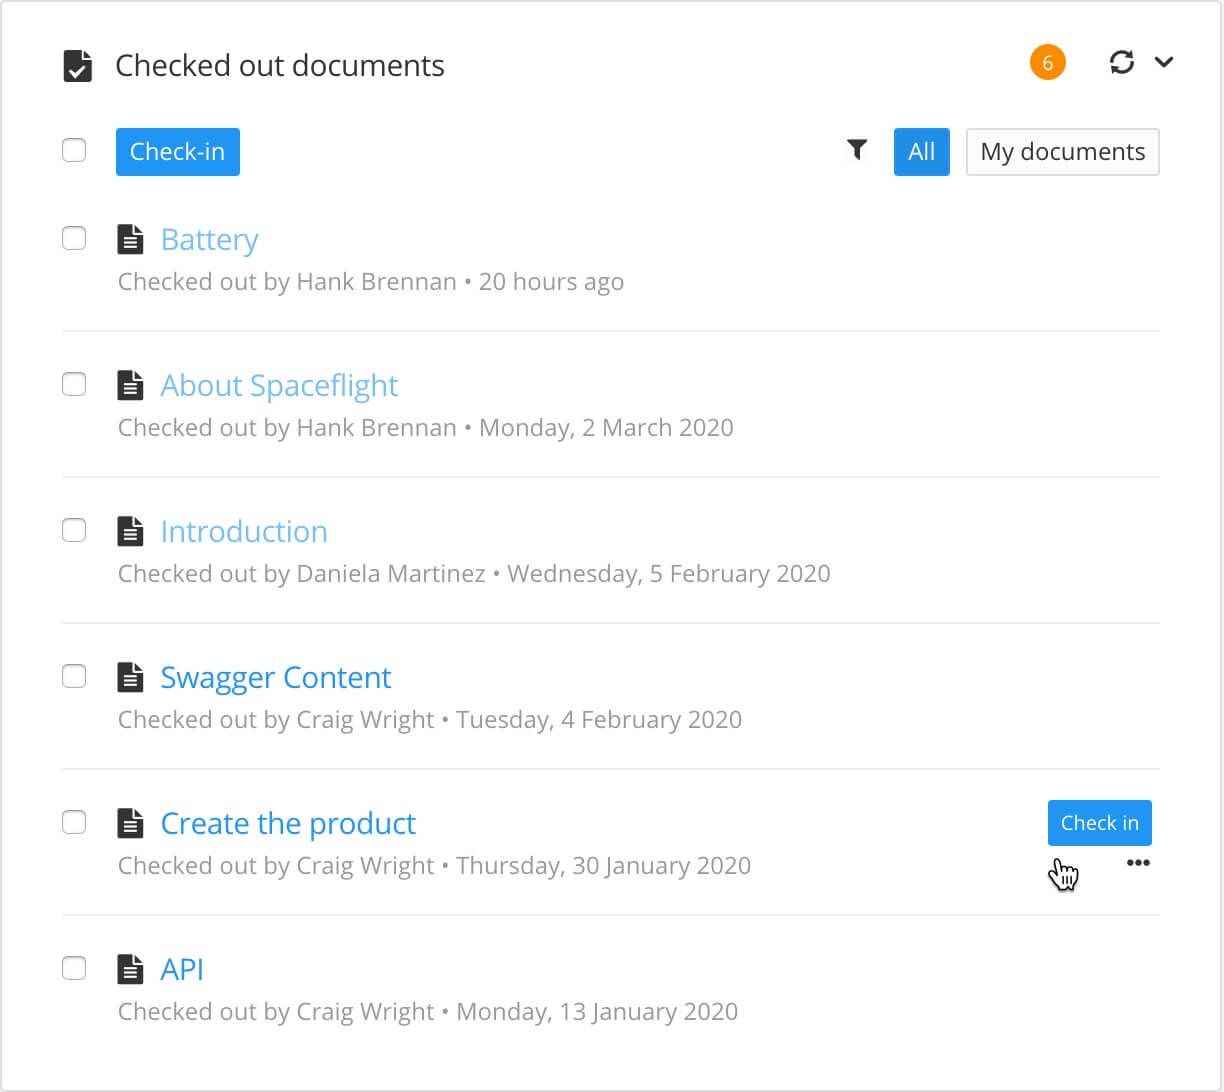
When content is checked out, you will see a checkmark in the Content Manager, Resource View and Checked Out Documents Panel. By default, Paligo is not overly restrictive about checkouts, a user can check in someone else's documents if needed. This is to stop check-outs hampering your work, for example, in case someone forgets to check in before going on vacation or is otherwise unavailable. The content can be checked in from the Checked Out Documents Panel or by using its dotted menu (...) in the Content Manager. We recommend you use the Automatic check-in that checks in content when the Editor is closed.
 |
Find out who is working on a topic or publication:
-
Hover over the checkmark in the Content Manager or Resource View to display a popup.


-
Find a complete list of all checked-out content in the Checked Out Documents Panel.
We recommend that you create a new topic for each section of content that needs a heading (either a top-level heading or a subheading). By having your content in separate topics, it becomes more versatile. For example, you could have a topic as a subsection in one publication but as a top-level topic in another publication.
When you create a topic, you can either:
-
Create a Topic in Content Manager. It will not be associated with any publications.
-
Create a Topic from Structure View that will automatically to associated with a publication. It can still be used in other publications as well, if needed.
Note
For an introduction to topics and publications, see Topic-Based Authoring.
There are two ways to create a topic from the Content Manager:
-
Either:
-
Select the menu at the top of the Content Manager and then select Topic.

-
Select the dotted menu ( ...) for a folder and then select Create Content.

-
-
Use the Create content dialog to set the properties for the new component:

-
Make sure that the Document Type is set to Topic.
-
Enter a name for the new topic in the Document Title field.
Note
The characters you can use for titles are: numbers, language characters, punctuation characters and spaces. The punctuation characters are:
! " # $ % / & ' ( ) * + , - . : ; < = > ? @ [ \ ] ^ _ ` { | } ~
-
Use the Language section to choose which languages Paligo should include for the topic. You can select individual languages or check the Select all languages box to include all languages.
Note
You can only choose from those languages that are enabled on your Paligo instance. To learn about adding languages, see Language Management.
-
Use Open in editor to choose whether you want Paligo to display the new topic in the editor.
-
Check the box if you want Paligo to display the topic in the editor
-
Clear the box if you do not want Paligo to display the topic in the editor
-
-
Use Create another to choose whether you want Paligo to leave the Create content dialog open, ready for you to add another topic.
-
Check the box if you want Paligo to leave the Create content dialog open
-
Clear the box if you do not want Paligo to leave the Create content dialog open
-
-
-
Select OK.
Paligo creates the new topic.
Depending on your selections, Paligo may open the new topic in the editor automatically. Alternatively, you can select the topic in the Content Manager to display it in the editor.
To learn about the structure that is included in a new topic by default, see Structure of a New Topic.
Tip
Remember that your new topic is not included in any publications. To learn how to add it to a publication, see Add Content to a Publication.
It is possible to create new topics from the publication structure. The two benefits of this method are that:
-
The topic is automatically included in the publication.
-
The topic can instantly be moved to the intended position in the publication structure
Tip
At the top of the Content Manager, you also have the option to create content. This will however not automatically end up in the publication.
 |
-
Select the publication in the Content Manager.


Paligo displays the Structure View, which consists of three sections: Structure, Metadata and Preview.
-
Select the arrow next to the New topic button to choose where to save the new topic.

Note
If not done, the topic will by default be saved in the same folder as the topmost publication or topic.
-
Select New topic.

-
Name the new topic.
-
Move the topic to its intended position in the publication structure.
-
Select Save to confirm the publication changes.

Note
The new topic is created at the chosen location and can now be edited.
When you create a new topic, Paligo automatically adds some structural elements to it. By default, a new topic consists of a section element, a title element, and a para element:
 |
-
sectionis the container for the topic's other elements. -
titleis the topic's heading. -
parais the first paragraph in the topic.
To add content to a topic, you need to add suitable elements to form the structure. You can then add your content inside the elements. For example, if you wanted to have two paragraphs and an image, you would need to add two para elements and also the mediaobject, imageobject, and imagedata elements that are needed for an image. Paligo has toolbar options that make it easy to add commonly used structures in just a few clicks. There is also an Element Context Menu that you can use to build structures one element at a time.
To learn about adding content to a topic, see About Authoring.
There is a difference between copying and duplicating topics:
-
Copy is used for adding topic Forks to a publication, see Add Content to a Publication.
-
Duplicate creates a new topic with the same content and the same name as the original, with "copy" and a number added at the end. The duplicated topic has its own unique ID and is completely separated from the original topic.
There is no content reuse with a duplicate, the same content is recreated. You can edit the copy and the content inside it without affecting the original topic.
Tip
If you want to create different versions of a topic, the Branching feature may be a better option. With branching, you can create a copy that can later be merged back into the original if needed.
To duplicate a topic:
-
Select the dotted menu (...) in the Content Manager for the topic you want to duplicate.
-
Select Duplicate.


Paligo creates a duplicate of the topic.
-
Select its dotted menu ( ... ) and choose Rename.

-
Enter a new name.
-
Confirm the name change with the checkmark.

You can set up topics to be included in your HTML5 output, but not to appear as results in the search. This way you make your search more useful by only including more detailed topics that give your users the information they need.
Release notes are often excluded from the search results because they are useful to have in your documentation, but they rarely provide enough detail.
Tip
You can also exclude topics from the navigation sidebar (also known as the TOC), see Exclude Content from Publication TOC.
To exclude a topic from the search results:
-
Select the topic or component in the Content Manager to open it in the Editor.
Alternatively, you can Create a Topic and edit that.
-
Select the
sectionelement in the Element Structure Menu.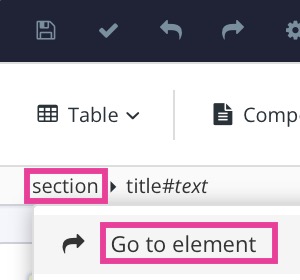
-
Select Go to element.
-
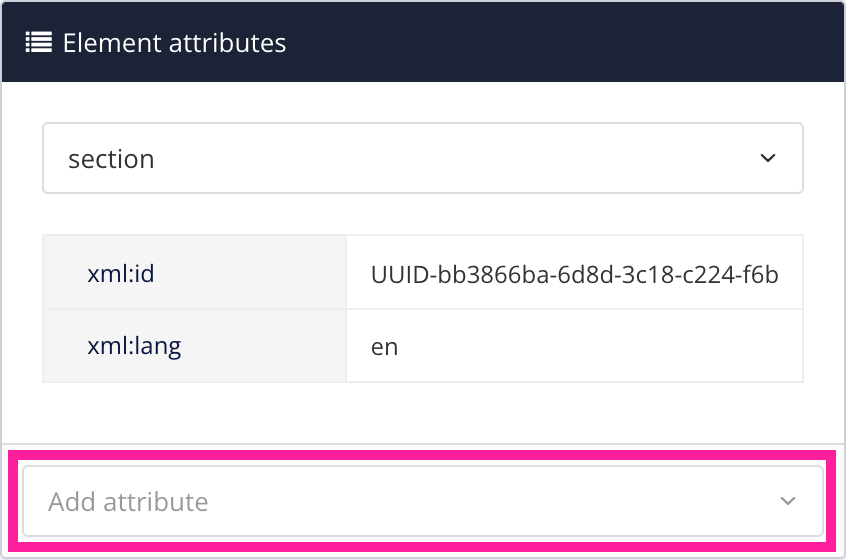
Add the
roleattribute in the Element Attributes Panel and set the value tonotinsearch.
Note
The
roleattribute is not inherited. If you have different levels of topics, you need to add theroleto all of the sections that you want to exclude from the search, not just thesectionof the top-level topic. -
Select Save.

When you publish the topic to your HTML5 help center, the search will not include the topic in its results.
By default, the headings do not use numbering. If your documentation needs numbered headings, you can set Paligo to include numbers, see Numbered Headings.
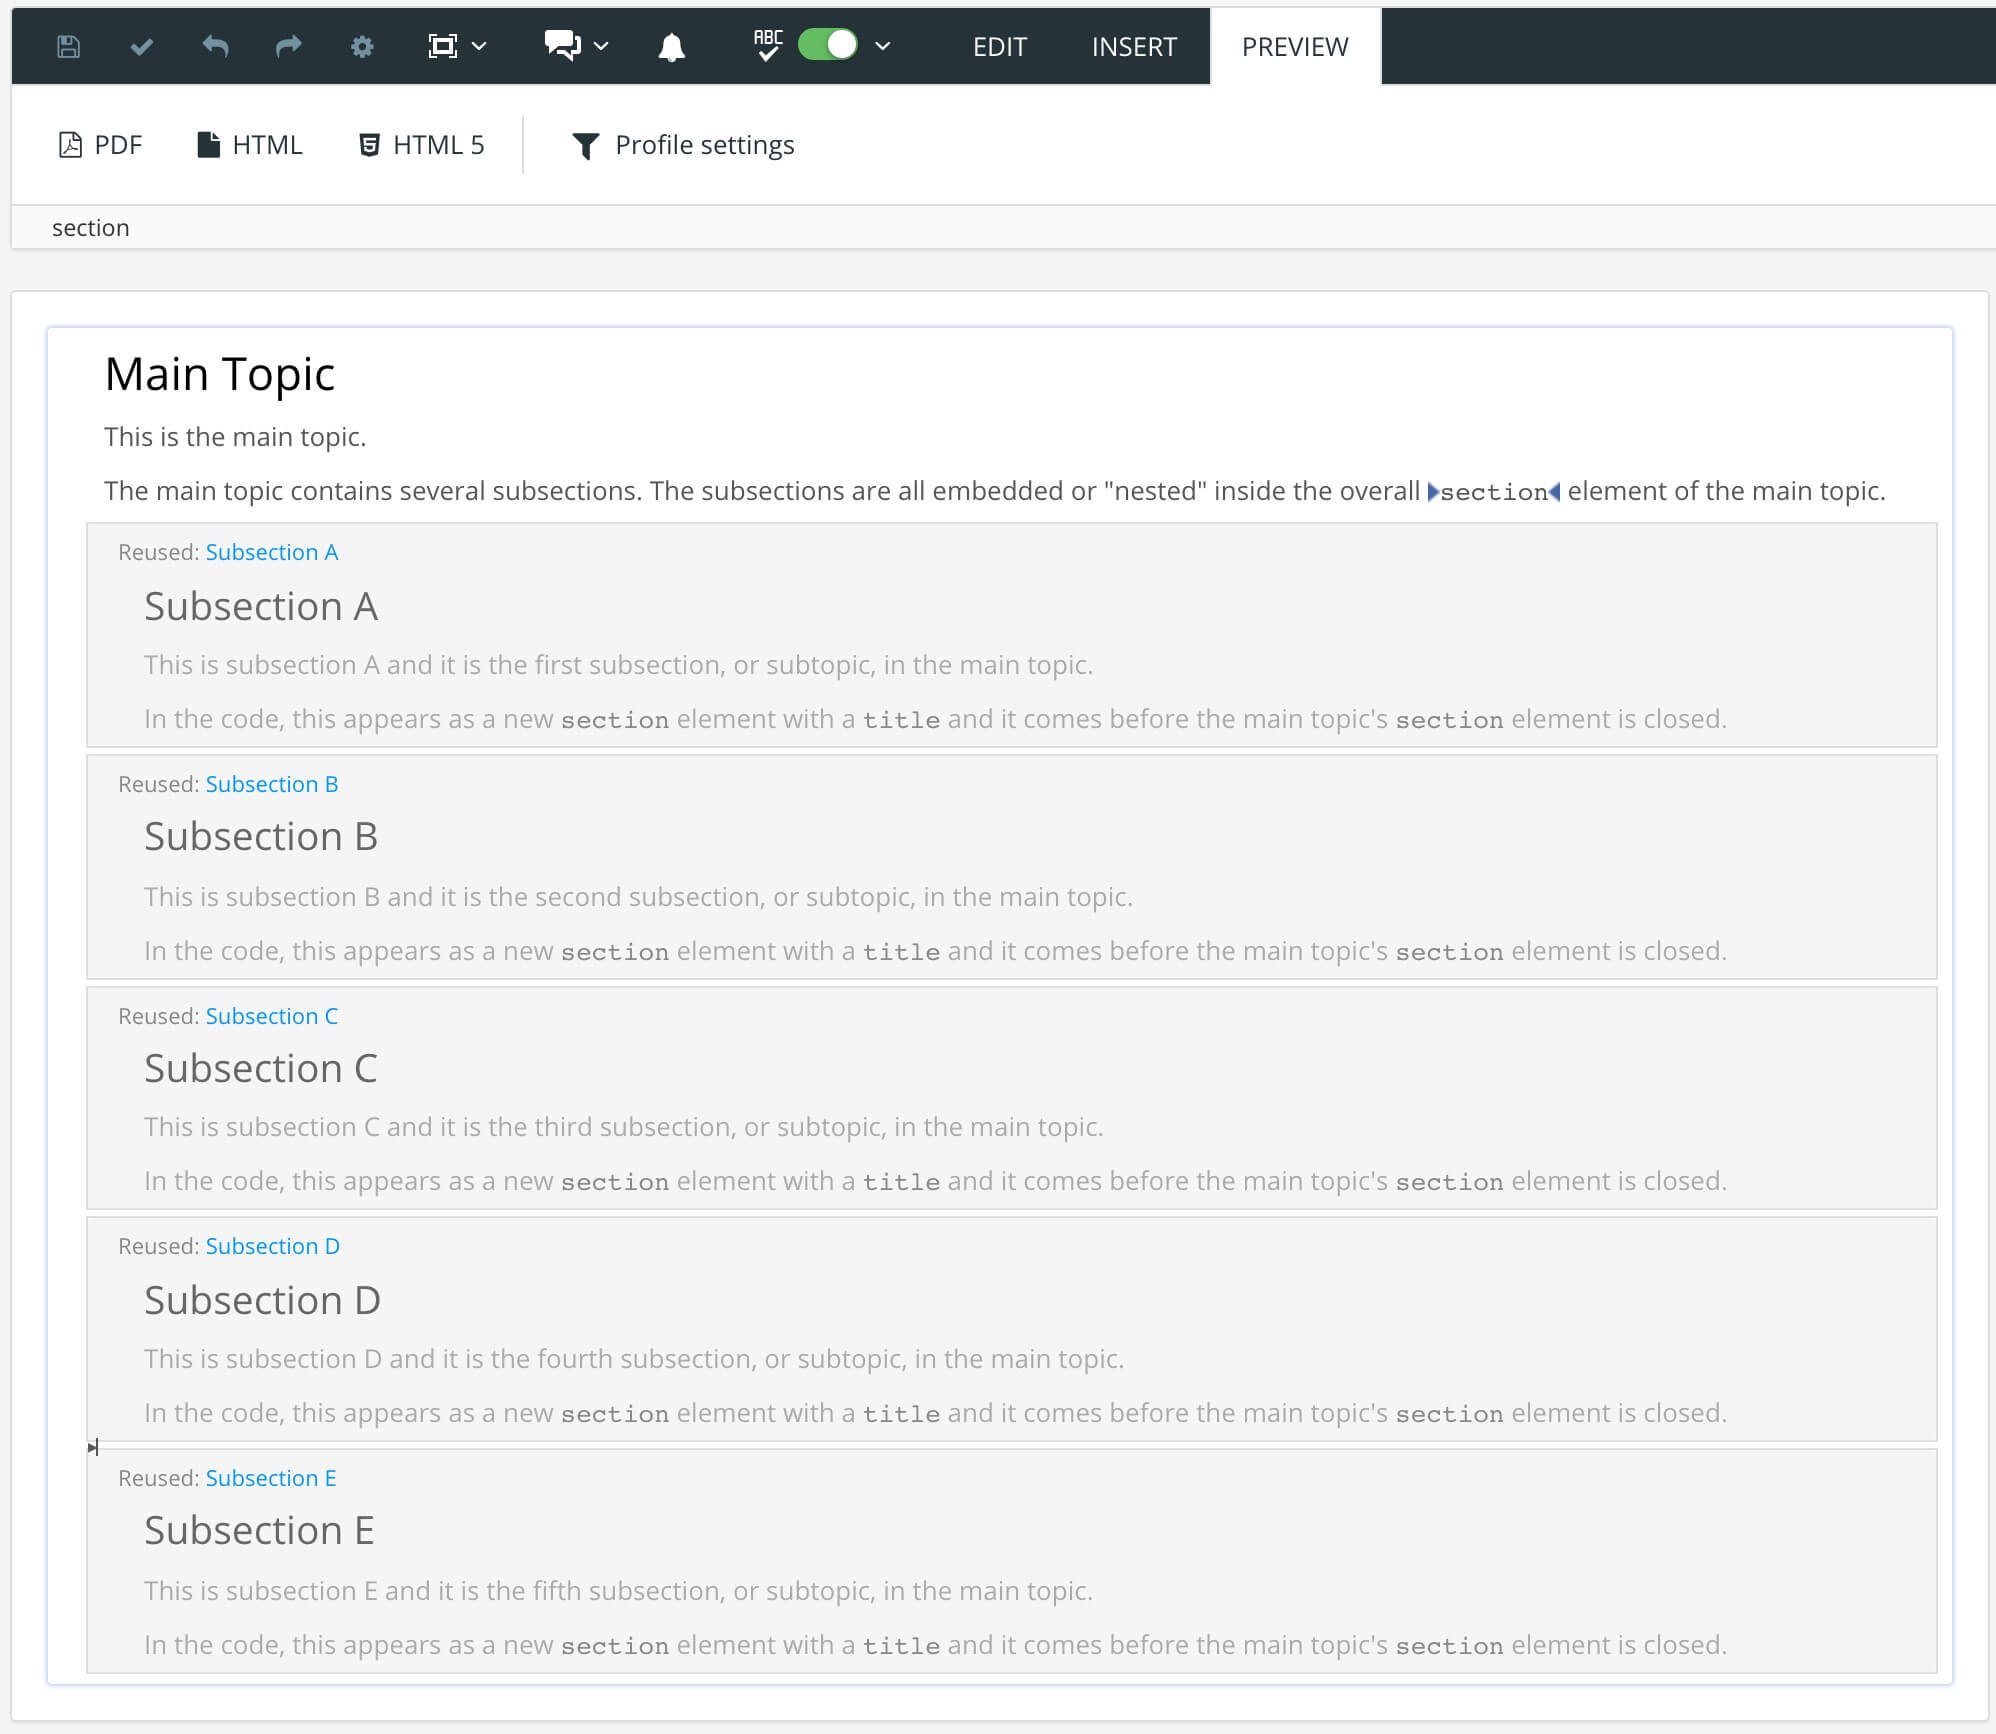
You can also have subheadings in your topics. These help to break up pages that contain lots of information, so that they are easier to read. There are several ways of creating subheadings and subsections, as described in Subsections.
 |
Example of a help page that has subheadings (subsections).
In Paligo, each topic has a:
 |
-
Resource title is the name of the topic in the Content Manager.
Changing the Resource title or the text in the
titleelement can affect the URL of the topic in HTML outputs. This depends on how your Layout is set up for publishing, see Topic File Names. -
sectionelement represents the topic as a whole. You can see it when you open the topic in the editor. -
titleelement comes immediately after thesectionelement and is for the main heading of the topic. By default, it is set to match the Resource title, but you can change either of them. They do not have to match.Some other elements also have
titles, such as tables and examples. Thesetitles are included by default but you can remove them if you wish.
Subsections
To make a text easier for the reader to consume, you can use subsections to divide your content into smaller pieces of information, see Create Subsections.
Benefits of using subsections:
-
Readers can quickly scan the main title and the subtitles to get a feel for what the page is about.
-
Subsections make the writer focus on the information needed for the subsection rather than the topic as a whole.
-
Smaller sections of content are more visually appealing. A long page of text can be off-putting.
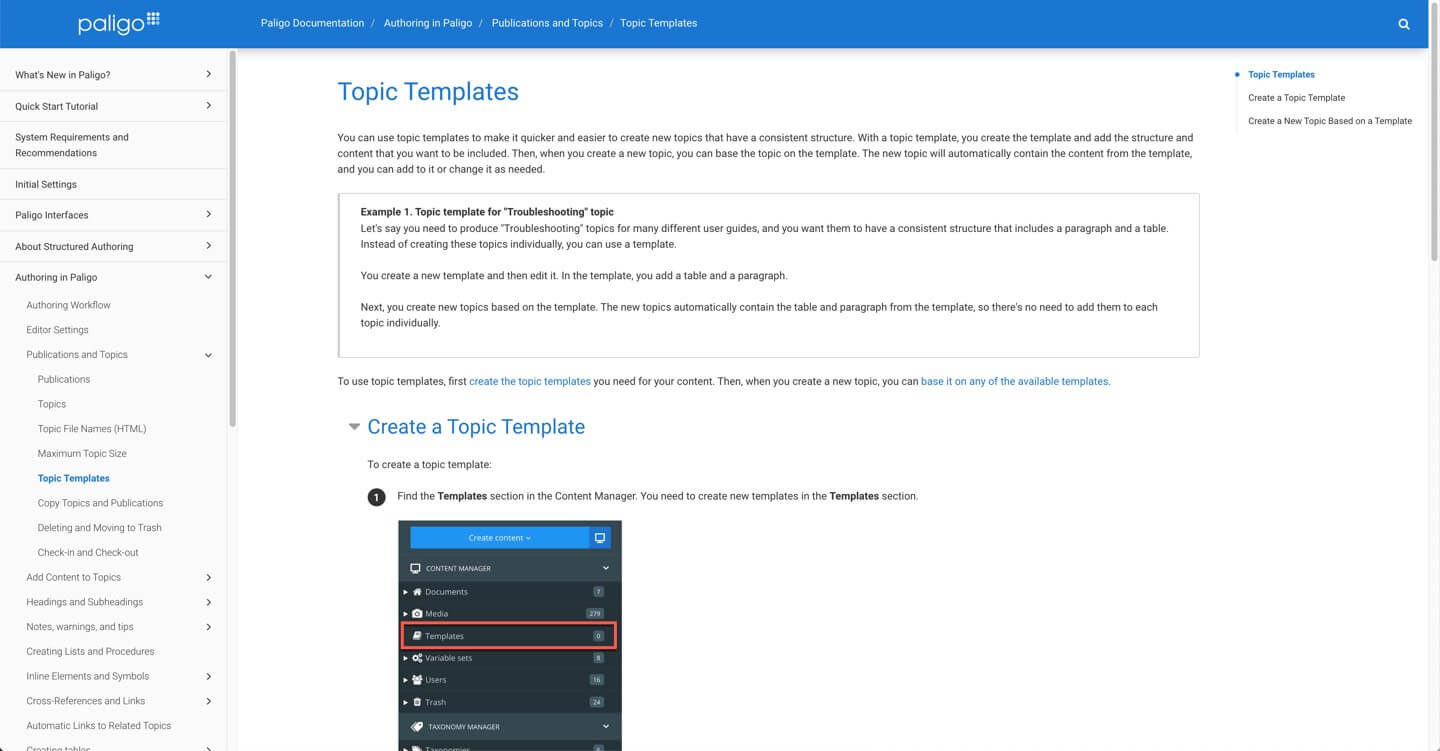
|
This example shows the "Topic Templates" page that contains a subsection called "Create a Topic Template".
Subsections is a great way to make your content easier to read, as you can use them to break up a page into separate, but related pieces of information. There are several ways to create subsections in Paligo, each with their own pros and cons. If you know that you will need to reuse your main sections and subsections separately, you can create each section as a separate topic and then:
But the downside of this is that when you are editing, you can only see one section at a time. (In the output, your readers will see the content as a main section with a subsection on the same page, if space allows). If you want to be able to see the main section and the subsection in the same topic while editing, use of these methods:
Note
With these two methods, the subsections are shown inside the "main" topic. But this also means that if you reuse the "main" topic, you will also reuse the sections inside it.
 |
You can use the publication structure to create subsections. When you publish, Paligo will automatically create the same structure in the output.
Watch the video or see the text below,
-
Create all of your sections and subsections as separate topics. For example, if you have an Introduction topic and you want it to contain a References subsection, create one topic for Introduction and one topic for References.
-
Open the publication structure.
-
Drag your topics into the structure. You can create subsections by dragging the topics left and right below other topics.
-
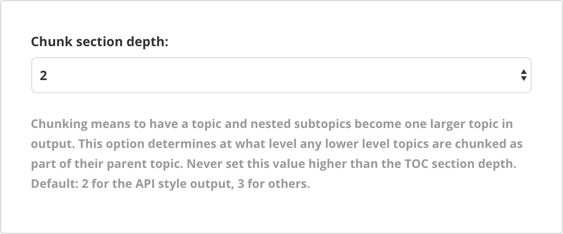
For HTML outputs only, select Layouts and edit the layout you will use for publishing. In the Toc and chunking settings, use Chunk section depth to control whether topics become subsections. The default setting is 3, which means any topics at level 4 or below in the publication structure will become subsections of the level 3 topics.
Note
If a topic is set to have
xinfo:chunk=yes, it will always be on its own page, even if it is at a lower level than the Chunk section depth. (see Use Chunking to Control Subsections) -
Publish your content.
For PDF outputs, the subsections are shown on the same page as the main section, where space allows. They are set as subsections with lower heading levels automatically.
For HTML outputs, Paligo displays each topic on its own page until the Chunk section depth is reached. Topics at a lower level then become subsections, unless they are specifically set to be separate chunks (see Use Chunking to Control Subsections).
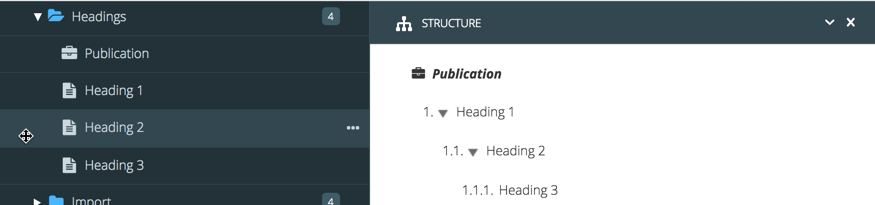
In this example, we have three topics. To keep the explanation simple, we have named them "Heading 1", "Heading 2" and "Heading 3".
In the publication structure, "Heading 1" is set as the top-level topic and "Heading 2" and "Heading 3" are nested as subsections below "Heading 1".
 |
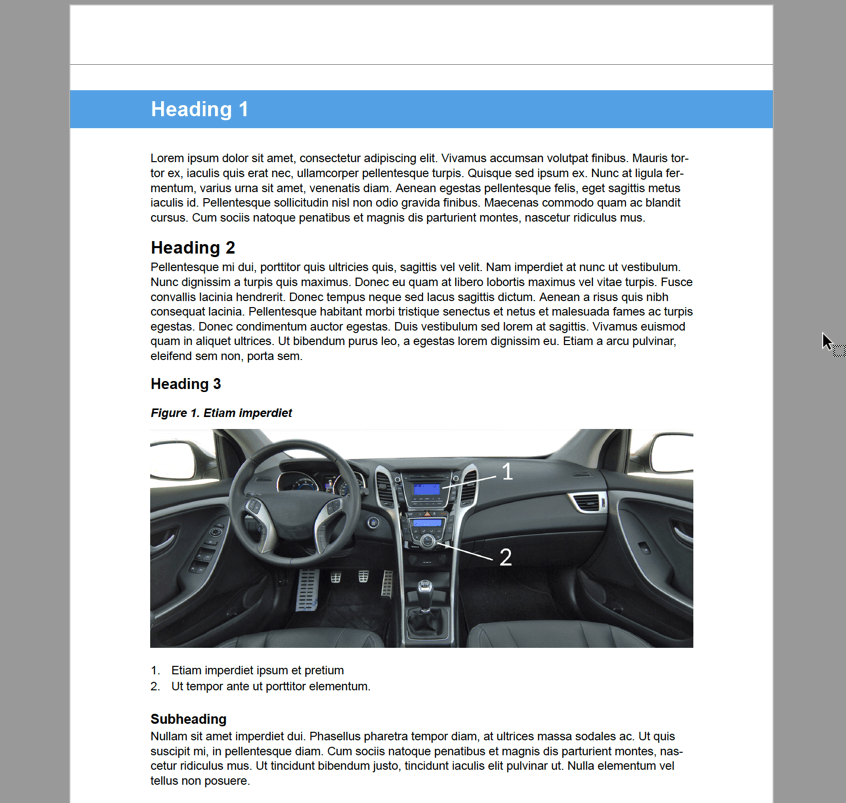
We publish to PDF.
Paligo detects the hierarchy of topics in the publication and recreates it in the PDF output. The "Heading 2" and "Heading 3" topics appear as subsections of the "Heading 1" topic.
 |
You can use Paligo's chunking feature to control whether a topic can be used as a subsection or to appear as a separate web page in the HTML / HTML5 output. The term "chunk" means that a topic has to be on its own. So if a topic is set to xinfo:chunk with the value
set to:
-
Yes - the topic cannot be a subsection inside another topic and will always be on a separate page when published. It cannot be a subsection on another page.
-
No - the topic can be a subsection inside another topic.
Note
Learn more about chunking settings, see Chunking.
To set the chunking value:
-
Select the topic or component in the Content Manager to open it in the Editor.
Alternatively, you can Create a Topic and edit that.
-
Select the
sectionelement in the Element Structure Menu. -
Select Go to element.
-
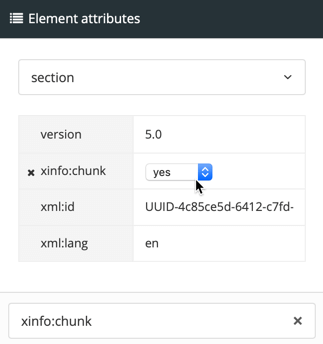
Add the
xinfo:chunkattribute in the Element Attributes Panel and set its value to:-
Yes to prevent the topic from being a subsection.
-
No to allow the topic to be a subsection.
-
-
Select Save.
Important
The xinfo:chunk value takes priority over the Chunk section depth setting in the layout editor. For example, if you set the Chunk section depth to 3, it normally means that any topics at level 4 or below
will become subsections of the "parent" level 3 topic. However, if your level 4 topic has xinfo:chunk = yes, the level 4 topic will not be included as a subsection of its "parent" level 3 topic. Instead, it will be a separate topic.
There are two ways to use chunking (and they can be combined):
-
Set the default level at which you want topics to become a chunk under "TOC and chunking" in the Layout Editor.
-
Add the
xinfo:chunkattribute to thesectionelement in a topic via the Element Attributes Panel.
If you have a publication called "Mars Travel Manual" and you have organized it so that there are topics at different levels.
 |
You are going to publish to HTML5 and your layout has Chunk section depth set to 2.
 |
When you publish, the output has the top-level and second-level topics as separate pages. The third-level pages and lower are subsections.
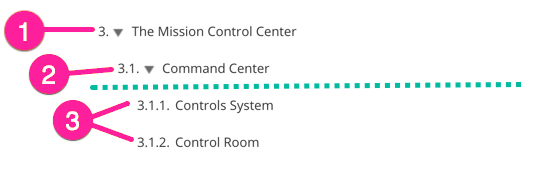 |
So if we look at the "The Mission Control Center" topic and its lower-level topics, the output will work like this:
-
"The Mission Control Center" is a top-level topic. It is higher than the Chunk section depth setting of 2, so it has its own page in the output.
-
"Command Center" is a second-level topic. It is at the same level as the Chunk section depth setting of 2, so it has its own page in the output.
-
"Controls System" and "Control Room" are third-level topics. They are below the Chunk section depth setting of 2, and so they do not get their own page. Instead, they are subsections on the "Command Center" topic, as that is their immediate "parent" in the publication structure.
Note
The green dotted line in the image represents the Chunk section depth setting of 2.
But what if you wanted "Controls System" to be a subsection of "Command Center" and "Control Room" to have its own page? To do that, you would set the "Control Room" topic to have the attribute:
xinfo:chunk = yes
With this in place, Paligo will give the "Controls System" topic its own page in the published output, as xinfo:chunk takes priority over the Chunk section depth setting. So the result is that the output has:
-
"The Mission Control Center" and "Command Center" topics have their own pages as they are at a higher level than the Chunk section depth.
-
"Control Room" has its own page as it has
xinfo:chunk=yes. The Chunk section depth does not apply to this topic. -
"Controls System" is a subsection of "Command Center" as it does not have
xinfo:chunk=yesand so the Chunk section depth does apply.
If you like to be able to see the subsections inside topics while editing, using components for subsections is a good choice. With this technique, you create your main section and subsections as separate topics, and then import the subsections into the main topic. You can then view the main topic and subsections all inside the same topic. This can make it easier to check the flow of your content and that you have covered all of the points you need to make.
To learn how to use components for subsections, watch the video or read the instructions below.
-
Create all of your sections and subsections as separate topics. For example, if you have an Introduction topic and you want it to contain a References subsection, create one topic for Introduction and one topic for References.
-
Open a topic that will be a main section that contains subsections.
-
Select the Insert tab in the Toolbar.
-
Select Component and choose a topic.


The topic is added as an
importelement and you can see it as a subsection in your topic. -
Repeat steps 3 to 4 for each of the subsections you want to add and save each topic.
-
Select Save.
-
When you have finished adding topics as components, publish to HTML.
A quick and easy way to create a subsection is to add a section element inside another section element. You will then be able to see the main section and the subsection in the same topic while you are editing. However, there are
some limitations with this technique that makes it better to use an inserted component instead:
-
Reusability - You cannot reuse the subsection in other topics, unless you Convert Subsections into Separate Topics and import them as components, see Use Components to Create Subsections.
-
Number of subsections - The Paligo validation recommends a limit of10 sections per topic (a main section with 9 subsections) and enforces this via the "Paligo Recommended Rules" in the Editor Settings when validating / saving a topic. Note that there is no limitation when it comes to subsections that are inserted as components. However, if you know that a subsection is only needed in one topic, you can create it as a section inside a section. Read about possible settings in Editor Settings.
-
Searchability - Subsections not being inserted as components can be more difficult to find in the web search than topics. They can also be harder for the writer to via the Content Manager.
To add a second section element as a subsection:
-
Position the cursor at a valid position for a subsection.
You can only insert a section for a subsection at a position that is both:
-
A direct descendant of a section element (either the section for the main topic or a section for a subsection). It cannot be inside another element.
-
Immediately followed by another section element or a closing section element (
</section>).You cannot have content "floating" between subsections or between a subsection and the end of the main topic. Your content must be inside the main topic and before the subsections or inside one of the subsections.
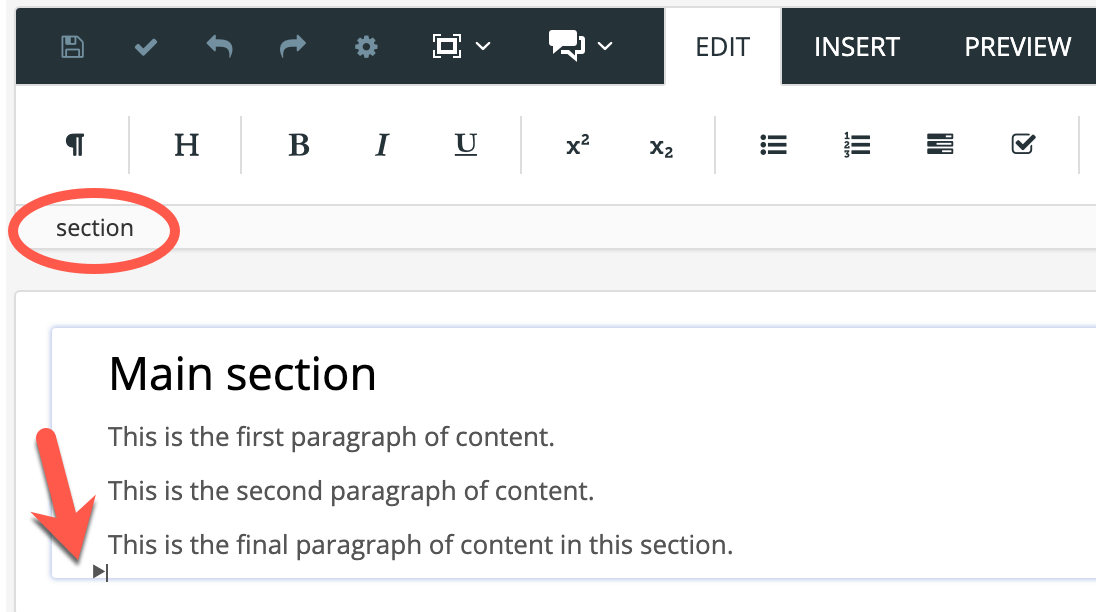
CORRECT: The cursor is positioned outside the other elements, and is a direct descendant of the section element of the main topic. The element that follows the position is the closing element for the main topic, and so is </section>. A subsection can only be followed by a section or closing section element.
INCORRECT: The cursor is positioned inside an element. The selected position is not a direct descendant of the section element of the main topic.
Note
In a topic, all of the content, including your subsection section elements, must be inside the main <section> and </section> tags of the topic.
-
-
Press Alt + Enter ⏎ (Windows) or Command ⌘ + Enter ⏎ (Mac) to display the Element Context Menu.
-
Enter
sectionand select it from the menu.A new section element is added to the topic. As it is inside the main
sectionelement, the newsectionappears as a subsection. -
Enter the title for the new subsection. You can then add content to the subsection in the same way as any other topic.
Note
You cannot add para elements and other block elements between subsections. The only valid content after the end of a subsection is another subsection.
Long topics with many subsections can be difficult to read because there's too much information provided in one place.
To avoid this "cognitive overload", you can convert the subsections into separate topics. You can choose to:
-
Create subsections by embedding a topic inside another topic, see Insert Component.
-
Keep the topics separated and use Cross-References and Links to guide people from one topic to another.
|
In the image above, the subsections have been converted into separate topics and they are embedded in the main topic.
Tip
If you need a topic to contain several subsections, you can make the content less overwhelming by using Accordions (Collapsible Sections). They allow a subsection to be collapsed, which makes the subsection content only visible when the reader selects the subsection heading.
To convert a topic's subsections into separate topics, you can use Paligo's Convert reusable component feature.
-
Select the
titleof the subsection you want to convert in the Element Structure Menu.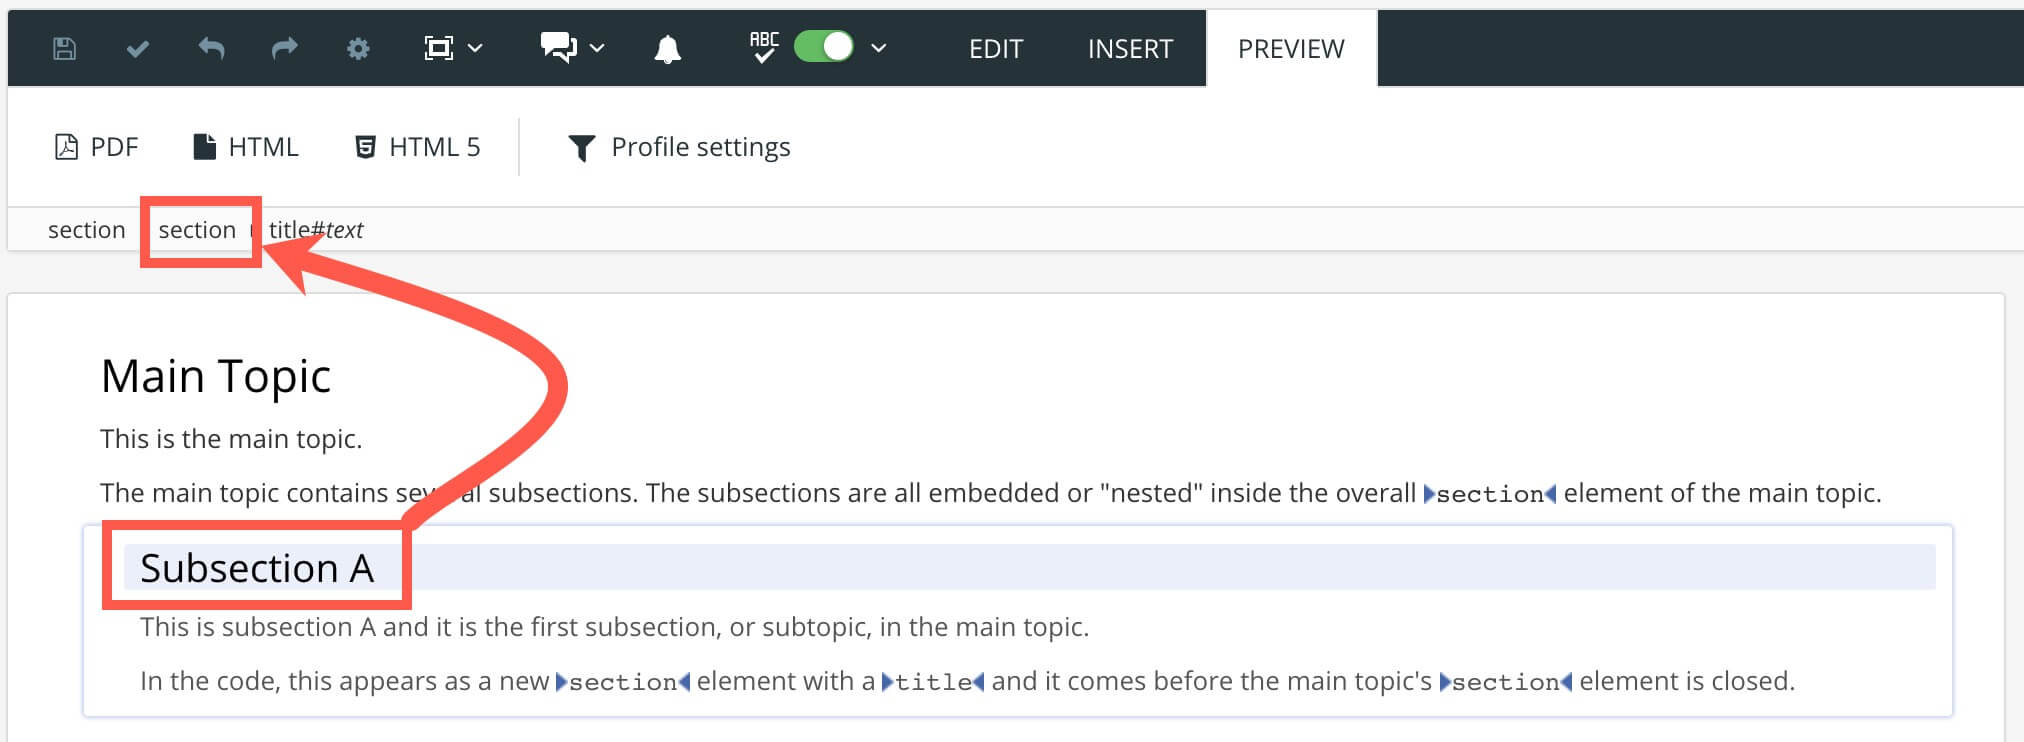
-
Select the
sectionelement for the subsection.Note
Make sure that you select the subsection's
sectionelement and not the mainsectionelement for the topic. -
Select the Convert reusable component from the menu.
-
The existing subsection
titleis suggested as topic name. You can edit it if necessary.
-
Select the folder to store the topic in.
-
Select the Reuse the component at position checkbox (in the lower left corner) to embed it in the current topic as a subsection.
If not selected the new topic is removed from the parent topic.
-
Select OK.
Paligo converts the subsection into a topic. If you checked the Reuse the component at position checkbox, the new topic is embedded in place of the subsection otherwise the subsection is removed from the topic.
Note
Reader-friendly URLs for subsections is only supported by HTML5 help centers.
With Paligo's Reader-friendly fragment identifiers (hash links) feature, you can have subsections that use a text URL instead of a unique ID (UUID). The text URLs are easier for people to understand, and so are better for when you need to share links to your HTML pages.
For example, if the UUID is used for creating the URL of a subsection, you get a URL like this:

Where the link targets the subsection by using the hashtag (#) followed by the UUID of the subsection's section element.
But if you enable the Reader-friendly fragment identifiers feature, the URL will use the text of the title element instead of the UUID, like this:

Note
URLs for subsections are also known as "hash links", as there is a hashtag # in the structure of the URL.
To set up SEO-friendly and reader-friendly URLs:
-
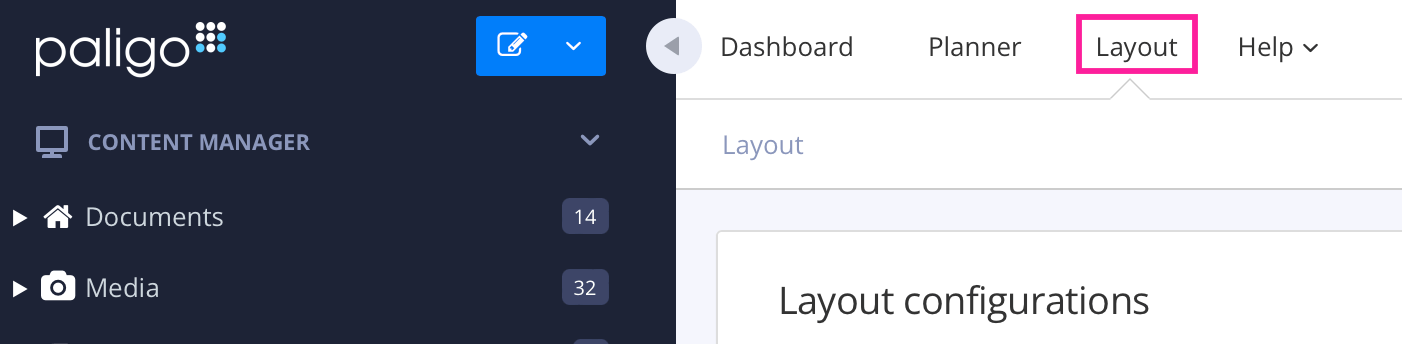
Select Layout in the top menu.
Paligo displays a list of Layouts. The list is empty if there are no custom Layouts in your Paligo instance.
-
Select the Layout you want to update or Create a Layout.
Tip
You can copy the URL of the Layout Editor and paste it into a new tab in your browser. This can be useful if you frequently switch between your Paligo content and the Layout settings.
-
Select General in the sidebar.
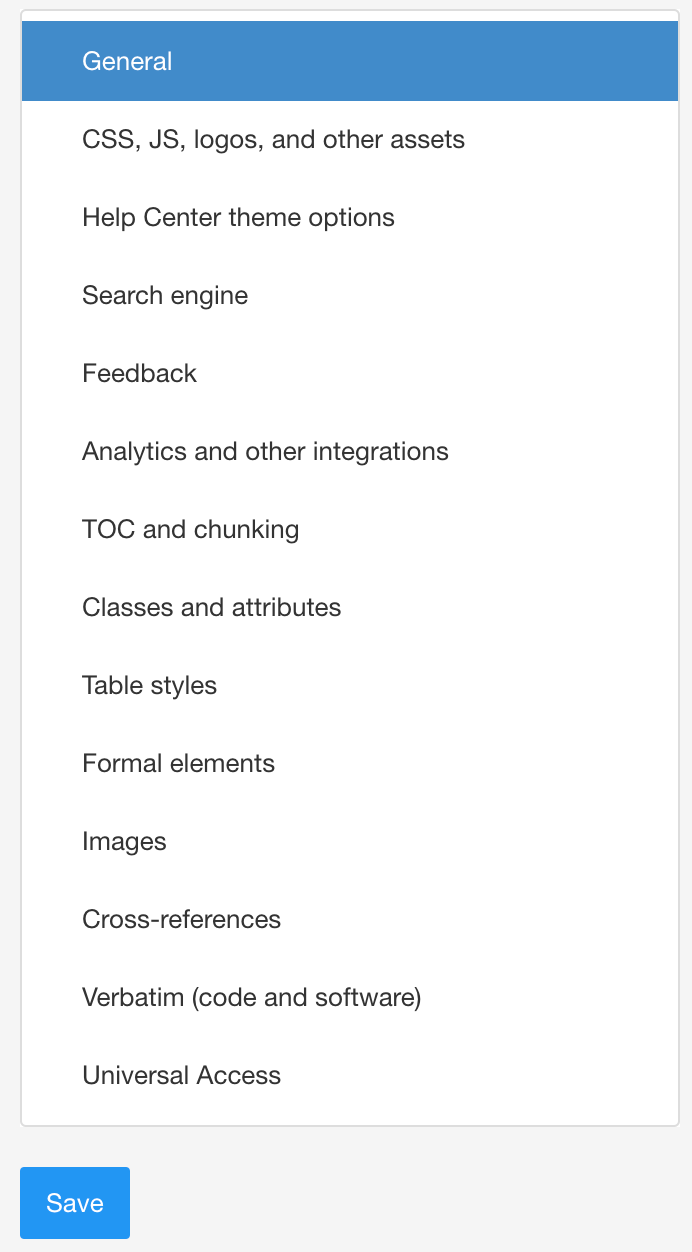
-
Enable the SEO-friendly output file names feature.
-
Enable or disable the Reader-friendly fragment identifiers (hash links) setting. (HTML5 Help Center Layouts only).
-
Set to Enable to use text URLs.
-
Set to Disable if you prefer to use the UUIDs for hashtag identifiers.
Important
For HTML5 Help Center outputs, you need to enable both SEO-friendly output file names and Reader-friendly fragment identifiers (hash links).
Note
Reader-friendly fragment identifiers is disabled by default, so that it does not affect any Paligo customers who want to continue using UUID in hash links.
-
-
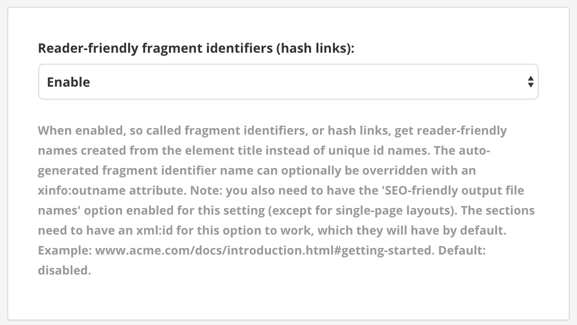
If you have previously shared links that used the UUID in the URL, you can choose to continue supporting them. The URLs with UUIDs will still work, even though the URL for the subsection will use reader-friendly text instead of the UUID.
Use Preserve legacy anchors if using reader-friendly fragment identifiers to choose whether links with UUIDs will continue to work.
-
Set to Enable to preserve the UUIDs so that links will continue to work.
-
Set to Disable to lose the UUID, so that only links to the new reader-friendly text version of the link will work.
Note
If you preserve the UUID, it does not mean that the UUID is used in the URL (the UUID is still in the topic, hidden in the code, but it is not part of the URL). The URL will use the new reader-friendly version. If you use the copy to link feature, the copy will also use the reader-friendly URL.
-
-
Select Save.
When you use the layout to publish your content, your chosen settings will be applied to the HTML output.
Note
If you have a publication that contains multiple topics or sections with the same title, you would get duplicate hash fragment identifiers.
If you have such duplicates, Paligo will add a suffix to differentiate them. The suffix is generated from the id of the second topic/section. But you can avoid using suffixes by manually providing a reader-friendly fragment identifier. To do this, use the xinfo:outname
attribute on the section element of each duplicate topic/section.
Accordions are sections of content that can be expanded or collapsed for HTML5 or Zendesk output. They are useful when you have a lot of subsections that make it hard to overview the topic. The reader can then expand or collapse each section in turn.
You can use accordions on sidebar elements and section elements. But for sections, the accordion only appears when that topic is inserted into another topic as a subsection, see Insert Component.
 |
Paligo supports accordions (collapsible sections) for HTML5 and Zendesk output. In other output formats, the content will appear as regular text. You can create accordions for topics (section elements) and informal topics (sidebar elements).
There are two ways to create an accordion. Use the way that matches what you want to achieve:
-
Set a a topic to display as an accordion, but only when it is included inside another specific topic as an imported component.
If you are unfamiliar with inserting topics as components, see Insert Component.
When you have created an accordion, use Preview to test that it works (see Test your Accordions.)
Set an Accordion on a Section Element
If you want a topic to use an accordion wherever that topic appears, give the topic's section element a role attribute with value set to accordion:
-
In the Content Manager, find the topic (or informal topic) and select it to open it in the editor.
-
In the Element Structure Menu, select a
sectionelement orsidebarelement and then select Go to element.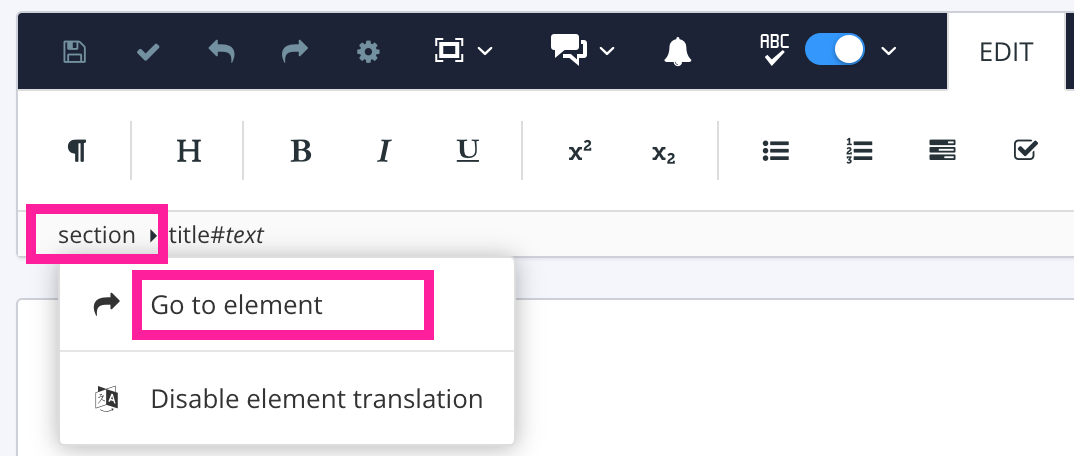
Note
It is possible to have multiple
sectionelements in a topic. The first (leftmost)sectionrepresents the topic as a whole. Any othersectionelements are for subsections inside the topic. We recommend that you create subsections by inserting a topic as a component inside another topic rather than create asectioninside asection. -
Select Add attribute in the Element Attributes Panel.
-
Enter
Roleand select it from the menu.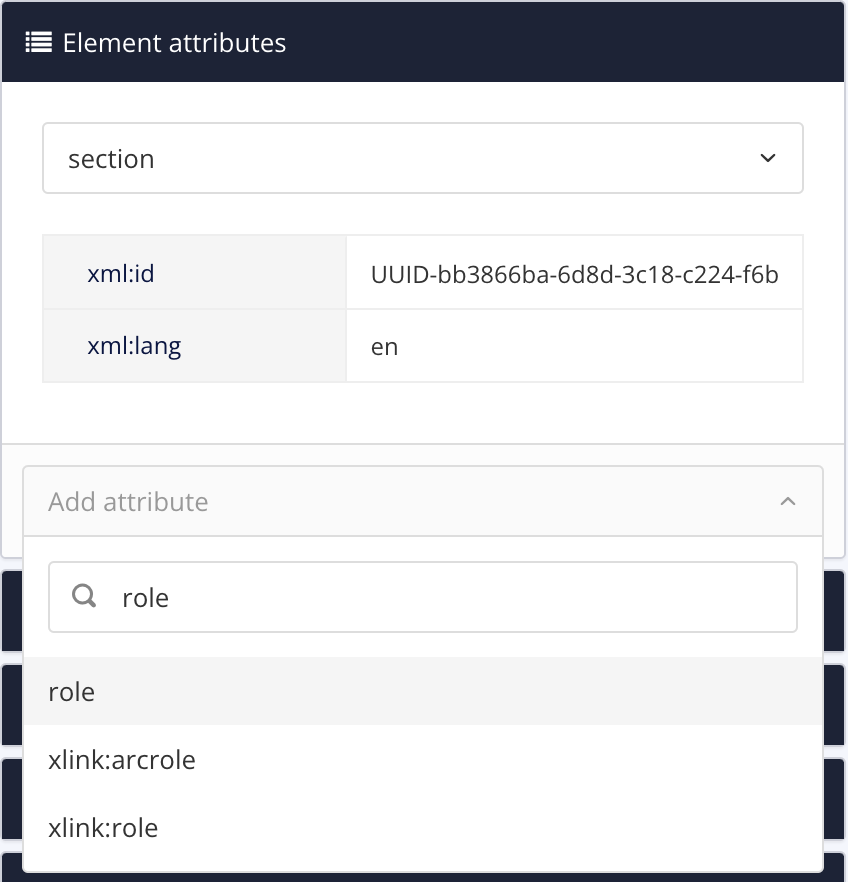
-
Enter
accordionas theroleattribute value.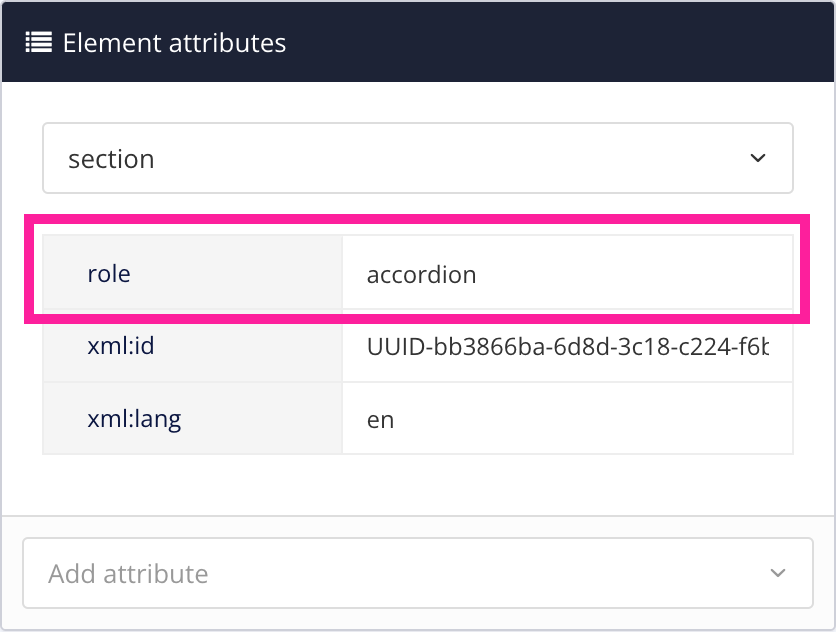
-
Select Save.
-
Select Layout and then select the Layout you are going to use for publishing. Make sure that the Output role attribute as class names setting is enabled (for details, see Enable Output Role Attribute as Class Names). Accordions will not work if this setting is disabled.
When you publish to HTML5 or Zendesk, the section or sidebar will appear as an accordion (when it is a subsection of another topic).
Tip
You can style the accordion by using custom CSS.
For example, if you want a background color for the header, create a CSS file (or edit an existing one) and use:
.panel-default > .panel-heading { background-color: #fafafa; padding: 1em; }
You can then upload the CSS to your Layout (see Upload Customized CSS).
Set an Accordion on an Imported Subsection Topic
If you create subsections by inserting a topic inside another topic, you can set the subsections to display as an accordion. There are two ways to do this:
-
Set the subsection topic to have
role:accordionon itssectionelement. This makes the topic display as an accordion wherever it is used (see Set an Accordion on a Section Element). -
Edit the source code for the container topic ("parent" topic) and set the
xi:includeelement for the subsection to havexlink:role="accordion". This makes the subsection topic display as an accordion, but only when it is used as a subsection in this particular "parent" topic. If the subsection topic is also used elsewhere, it will not display as an accordion in those other locations (unless you set it up to have an accordion in those places too).
To edit the source code for the "parent" topic and make an imported subsection display as an accordion:
-
In the Content Manager, find the "parent" topic that contains the subsection ("child" topic). Select the "parent" topic to open it in the editor.
-
Click on the subsection ("child" topic) and then look in the Element Structure Menu at the top. Make sure that the subsection is represented by an
importelement in the structure of the topic.
A topic containing another topic as a subsection. The subsection topic has been inserted as a component and is referenced by an import element.
If you do not see an
importelement, it is likely that the subsection has been created in another way. For example, added as asectionelement inside the "parent" topic. You can convert it into an inserted component by selecting itssectionelement and then choosing Convert to reusable component. Paligo will convert thesectioninto a separate topic and add animportelement in its place. -
Select the Edit tab in the toolbar.

-
Select Edit source code.

-
In the Source Code Editor, find the reference to the subsection topic ("child"). It is shown as an
xi:includeelement and it contains anxi:fallbackelement with aparaelement inside it, like this:<xi:include xmlns:xi="http://www.w3.org/2001/XInclude" parse="xml" href="UUID-17301a40-98ec-d396-2c42-1880b82e5358"> <xi:fallback> <para xinfo:translate="no">Reusing topic #UUID-17301a40-98ec-d396-2c42-1880b82e5358</para> </xi:fallback> </xi:include>Note
If your "parent" topic contains many imported subsections, it will have an
xi:includeelement for each one. They are shown in the order they appear in the "parent" topic. Make sure that you are looking at thexi:includefor the subsection you want to edit. -
Add
xlink:role="accordion"to thexi:includeelement. It should come after thehrefattribute and value. For example:<xi:include xmlns:xi="http://www.w3.org/2001/XInclude" parse="xml" href="UUID-17301a40-98ec-d396-2c42-1880b82e5358" xlink:role="accordion"> <xi:fallback> <para xinfo:translate="no">Reusing topic #UUID-17301a40-98ec-d396-2c42-1880b82e5358</para> </xi:fallback> </xi:include> -
Select Update.
If the source code is valid, Paligo saves it and closes the Source Code Editor. If the code is invalid, Paligo displays a notification. Check the code carefully for any errors and correct them.
-
Select Save.
When you publish your content, or preview it as HTML5, the subsection will display as an accordion. If you use the subsection topic elsewhere, it will not display as an accordion*.
*unless those other locations are also configured to have xlink:role="accordion".
Test your Accordions
When you set up a new accordion, it is a good idea to test it works as expected before you publish. You may find that you have made a mistake and the accordion is not working or that you have included information in the accordion that needs to be elsewhere.
To test an accordion:
-
In the Content Manager, select the "parent" topic that contains the subsection topic that has the accordion. Paligo opens the topic in the editor.
-
Select Preview and then HTML5.

Paligo opens a preview in an new tab.
-
Select HTML5.
-
If you have set up the accordion correctly, the subsection topic is displayed as an accordion. You can only see its title and there is an arrow icon next to it.

If you select the subsection topic's title or the arrow icon, it should expand the accordion, revealing the content in the topic.
If the accordion is not working as expected, check that you have set up the accordion correctly (see Set an Accordion on a Section Element or Set an Accordion on an Imported Subsection Topic). Look out for typing mistakes in the
roleattribute values and make sure you have applied the role to the correct element.
If you want all accordions to expand when a page in the HTML5 Helper Center output is loaded, add the following code to your custom JavaScript:
// Expand accordions
$(document).ready(function () {
    $('.accordion .collapse').collapse('show');
    $('.accordion .panel-heading').addClass('active');

    // Uncomment below if you're using AJAX
    /* $(document).ajaxComplete(function() {
            $('.accordion .collapse').collapse('show');
            $('.accordion .panel-heading').addClass('active');
    }); */
});
Note
This script will apply to accordions on any page and will only work for HTML5 Helper Center output.
If you want to change the title text for a topic, you should first think about how it will affect your published output.
-
For PDFs, a change to a heading does not affect the output, so you can make changes as needed.
-
For HTML, Paligo uses the title to generate the URL (address) of the webpage for each topic. So if you change the title, the URL will also change when you publish.
Paligo detects title changes automatically and updates your content to use the new URL. But Paligo cannot change any links that come from external systems. For example, if your website links to a page in the help and the URL of the page has changed, the link will no longer work. To avoid this problem, you can:
One way to change the title of a topic without affecting its URL is to use the xinfo:outname attribute. This attribute is available for the section element.
When you set an xinfo:outname value, that value is used for the URL of the HTML page for that topic. The xinfo:outname takes priority over all other URL settings, so will be used even if you set the HTML layout to use topic names instead of titles.
To keep the existing URL of an HTML page:
-
Select the topic or component in the Content Manager to open it in the Editor.
Alternatively, you can Create a Topic and edit that.
-
Change the text in the
titleelement. -
Select the
sectionelement in the Element Structure Menu. -
Select Go to element.
-
Add the
xinfo:outnameattribute in the Element Attributes Panel.
-
In your existing help output, browse to the page that has the URL you want to keep and copy the page part of the URL.
For example, if the page has the URL:
https://acmehelp/docs/en/6083-introduction.htmlCopy
6083-introductionas that is the page part of the URL. Do not include the.htmlfile extension, you only need the page name. -
Paste the page part of the URL into the value box for the
xinfo:outnameattribute.
-
Select Save.
When you publish to HTML, Paligo will use the xinfo:outname value for the page part of the URL. It will not use the title or the topic name, the xinfo:outname takes priority.
For example, let's say you have a topic and it's title is "Introduction". When this was first published, Paligo set the URL to: https://acmehelp/docs/en/introduction.html
Your customer support team then used links to that page when they replied to customer queries.
Some time later, you need to update the page title to "Introduction to ACME 100" but you do not want to break the links that customer support sent out.
You change the title text of the topic to "Introduction to ACME 100" and then add the xinfo:outname attribute to the section of the topic. You set the attribute's value to: introduction.
You publish the content to HTML. Paligo uses the xinfo:outname value (introduction) to create the page part of the URL, instead of the new title text. So in the output, the page has this URL:
https://acmehelp/docs/en/introduction.html
If you did not set the xinfo:outname, the page would have the new URL based on the change to the title text, and it would have been:
https://acmehelp/docs/en/introduction-to-acme-100.html
You can set Paligo to use topic names instead of titles for the filenames and URLs for HTML pages. The topic names are then used instead of the title text for the page part of the URLs.
For example, if a topic is named "IoT Controls" and has a title of "Controls for IoT System", the URL for the page in the HTML output will look like this: https://acmehelp/docs/en/iot-controls.html
Note
Note that the page part of the URL uses the name of the topic ("IoT Controls") and not the title text ("Controls for IoT System").
To set Paligo to use topic names instead of title text for URLs:
-
Select Layout in the top menu.
Paligo displays a list of Layouts. The list is empty if there are no custom Layouts in your Paligo instance.
-
Select the Layout you want to update or Create a Layout.
Tip
You can copy the URL of the Layout Editor and paste it into a new tab in your browser. This can be useful if you frequently switch between your Paligo content and the Layout settings.
-
Select General in the sidebar.
-
Control if topic names are used for URLs in Use resource name instead of title for the HTML output filename:

-
Set it to Enabled to use topic names.
-
Set it to Disabled to use the text in the topic
titleelement. Default
-
-
Select Save.
If you enabled the Use resource name instead of title for the HTML output filename setting, Paligo will use the topic names for the filenames and URLs. This means you can now change your topic title text without affecting the URLs for the
pages.
By default, Paligo uses text-only headings, but you can use numbered headings instead. Numbered headings have numbers as a prefix.
To enable or disable numbered headings, edit the layout that you use for publishing.
-
Select Layout in the top menu.
Paligo displays a list of Layouts. The list is empty if there are no custom Layouts in your Paligo instance.
-
Select the Layout you want to update or Create a Layout.
Tip
You can copy the URL of the Layout Editor and paste it into a new tab in your browser. This can be useful if you frequently switch between your Paligo content and the Layout settings.
-
Find the Section numbering settings.
On PDF layouts, the Section numbering settings are in Section titles > All sections.

For HTML layouts, the Section numbering settings are in Toc and chunking.

-
Use Section numbering to control whether your headings use numbers. Select Enabled for numbered headings, Disabled for text-only headings.
-
Use Section numbering maximum depth to control what heading levels have numbering. The default is 3, which means the top-three heading levels will be numbered, but level 4 onwards will be text-only.
-
Select Save.
You can choose whether your headings use a number prefix.
If you have topics with long titles, they can make your documentation look cluttered, especially in table of contents entries and cross-references. To reduce this problem, use the titleabbrev element to add a shorter alternative titles. Paligo will automatically use the
alternative titles in the table of contents and you can choose to use them in cross-references and breadcrumb links too.
For example, let's say you have a topic called "Configure the Wifi Connection for your Acme 100". The title is quite long and makes the TOC, breadcrumb, and cross-references look cluttered. For a neater look, you add the titleabbrev element and enter "Wifi" as an alternative
title. You also edit your Layouts so that Paligo uses the alternative title for cross-references and breadcrumbs. You publish to HTML5 and the output uses "Wifi" instead of the full title.
 |
Note
Paligo topics continue to use the full title that they were given (in the title element). The shorter titleabbrev is used automatically in the table of contents and optionally in the breadcrumb links and table of contents.
To add an alternative title to a topic:
-
Select the topic or component in the Content Manager to open it in the Editor.
Alternatively, you can Create a Topic and edit that.
-
Position the cursor between the
titleelement and the firstparaelement.
-
Press Alt + Enter ⏎ (Windows) or Command ⌘ + Enter ⏎ (Mac) to display the Element Context Menu.
-
Enter
titleabbrevand select it from the menu. -
Position the cursor inside the
titleabbrevelement.
-
Enter the text for the alternative title.

-
Select Save.
-
Select Layout and then select the Layout you use for publishing.
Paligo opens the Layout in the Layout Editor.
-
Set Paligo to use the
titleabbrevortitlein cross-references.-
On your Layout, navigate to the Use titleabbrev in cross-references setting.
-
On PDF Layouts, the setting is in the Cross-references category.
-
On HTML Layouts, the setting is in the General category.
-
On HTML5 Layouts, the setting is in the Cross-references category.
-
-
Set Use titleabbrev in cross-references to:
-
Enable to use
titleabbrevinstead oftitlein cross-references and the TOC -
Disable to use
titleinstead oftitleabbrevin cross-references and the TOC -
Default to inherit the value for this setting from the base Layout. The base Layout is either a built-in Layout provided by Paligo or another custom Layout, see Layout Relationships - Base, New, Duplicate.
-
-
-
This step only applies to HTML5 Layouts. Use the Layout to set the breadcrumb to use the
titletext ortitleabbrevtext:-
Select the General category.
-
Set Use titleabbrev in breadcrumb titles to:
-
Enable to use the
titleabbrevtext instead of thetitletext -
Disable to use the
titletext instead of thetitleabbrevtext -
Default to inherit the value for this setting from the base Layout. The base Layout is either a built-in Layout provided by Paligo or another custom Layout, see Layout Relationships - Base, New, Duplicate.
-
-
-
Select Save.
When you publish with your Layouts, Paligo will use the title or abbreviated title, depending on your choices in the Layout.
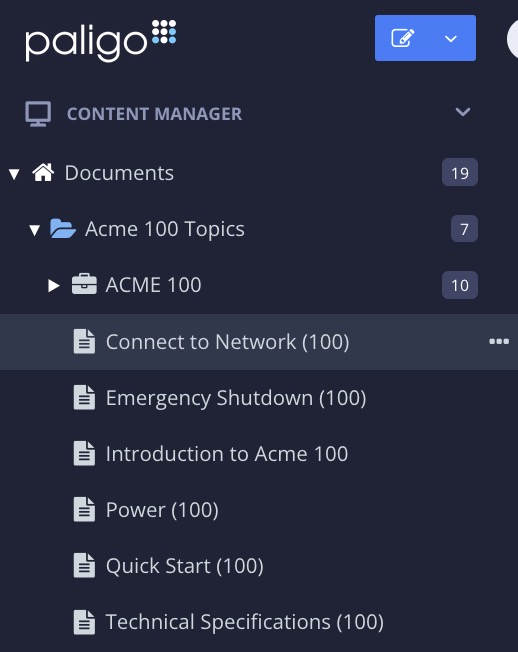
If you want to use an empty topic as a non-clickable label to categorize subtopics in the Table of Contents (HTML5), you can turn it into a topichead. It means that its title will show in the TOC sidebar, but it will only serve as a label for its child topics.
By adding the role attribute with its value set to topichead to the main section element, the topic becomes:
-
Visible, but non-clickable in the TOC sidebar, Category Panel Section and Featured Content Section for HTML5 output.
-
Excluded from internal search, Google search, and from the site map.
-
Skipped by Previous and Next navigation because it cannot locate its position on the site map.
-
Non-clickable in Breadcrumb Homepage Link.
 |
The main topics (Batteries, Fans, Motors and Solar Panels) in this image are "topicheads". In other words, empty topics that only serve as non-clickable labels in the TOC sidebar.
Important
If you publish and the child topics are not showing for a non-clickable label, try increasing the Chunk section depth. You can find this setting in the TOC and Chunking category on your HTML5 Layout.
Note
This type of label is only for navigation in the TOC sidebar and is not the same as branch labels or labels added with the phrase element.
To turn a topic into a non-clickable label for HTML5 output:
-
Select the topic or component in the Content Manager to open it in the Editor.
Alternatively, you can Create a Topic and edit that.
-
Select the
sectionelement in the Element Structure Menu. -
Select Go to element.
-
Add
roleattribute in the Element Attributes Panel and set the value totopichead.
-
Select Save.
-
Repeat this procedure for all topics that are to be non-clickable.
To open a topic, either:
-
Click on the topic's name in the Content Manager or Resource View.

Example of a topic being selected in the Content Manager.
-
Click on the topic's link on the Dashboard. This is only possible for topics and publications that have been worked on recently.

Example of link to open topic from the Dashboard
-
Select the topic's dotted menu ( ... ) and choose Edit and then Open in editor. There are also options for opening the topic in Review View, Contributor View, and Translation View.
The topic dotted menu ( ... ) is available in the Content Manager, Resource View, and also in the publication structure.

Example of opening topic from publication structure
-
Select the link to one of your Assignments (either in the email Paligo sends to you or from your Dashboard). Paligo will open the topics in that assignment in the view that is appropriate for your user account. For example, for contributors, the topics will open in the Contributor View.
You can preview how your topic will appear in different outputs which gives you the chance to resize images, consider reducing the amount of text to better suit your output format, use accordions to easier overview a page, detect broken links, or discover necessary updates to your layout settings. Paligo strongly recommends that you preview every time you create or update content.
Make the preview use your customized output, see Set Preview Layouts. To learn more about filtering / profiling, see Filtering / Profiling.
Note
The preview feature is not available for certain components, such as informal topics. But if you add it to a regular topic as a component, you can preview the regular topic, see Insert Component.
To preview a topic:
-
Select the topic or component in the Content Manager to open it in the Editor.
Alternatively, you can Create a Topic and edit that.
-
Select the Preview tab in the Toolbar.

-
Select Profile settings.

-
Choose the Variables and Filtering / Profiling that you want to be used for the preview.

Tip
You can save the variables and profiling settings so that they become the default preview settings, see Create a Favorite Profile (Preview Tab) and Set a Favorite Profile as Default.
-
Select Apply and close the Profile settings dialog.
-
Select the type of output (PDF, HTML or HTML5).

Paligo shows the preview in a new tap topic. It uses the default Layout for each type of output. This gives you a good idea of what your topic will look like when it is published.
Important
If you make changes to your topic, you have to regenerate the preview. Refreshing the existing preview in the browser will only reload the preview that was previously generated.
For HTML5 outputs, the file names are normally generated automatically, but it is also possible to set it individually.
Paligo has a number of options for how the HTML5 output file name is auto-generated. It uses either the UUID (Universally Unique Identifier), the title of a topic, or the name of the resource to generate the HTML5 file name, depending on your settings in the Layout Editor.
However, you can also set the output file name individually for particular topics if needed. This can be useful if you are using the option to create the file name from the topic title, for instance, and then need to change the title. By setting the output file as below, you make sure it does not change even though you change the title.
To manually set the file name for a topic:
-
Select the topic or component in the Content Manager to open it in the Editor.
Alternatively, you can Create a Topic and edit that.
-
Select the
sectionelement in the Element Structure Menu. -
Select Go to element.
-
Add
xinfo:outnamein the Element Attributes Panel.
-
Set the value to the name you want for the published file.
Note
You only need to enter the file name. Do not include the file extension at the end.
-
Select Save.
When you publish to HTML5, the file name for the topic is set to the value you defined for the xinfo:outname attribute.