Publications
A publication is a collection of topic references, called Forks, assembled into a certain order in the Structure View.
When selecting a publication in the Content Manager it is opened in the Structure View since you will mainly work with the structure of topics in a publication. It can also be opened in the Editor by using its dotted menu (...) in the Content Manager.
You do not write anything in the publication, except for the Publication Topic, where you enter the title, copyright and similar information. For the main content of your documentation, you write your content in Topics. To create the output, you assemble a collection of topic references in the publication structure.
When you About Publishing, Paligo creates an output in the format of your choice, such as an HTML5 Help Center or a PDF. It uses the publication structure to order the topics in the output.
 |
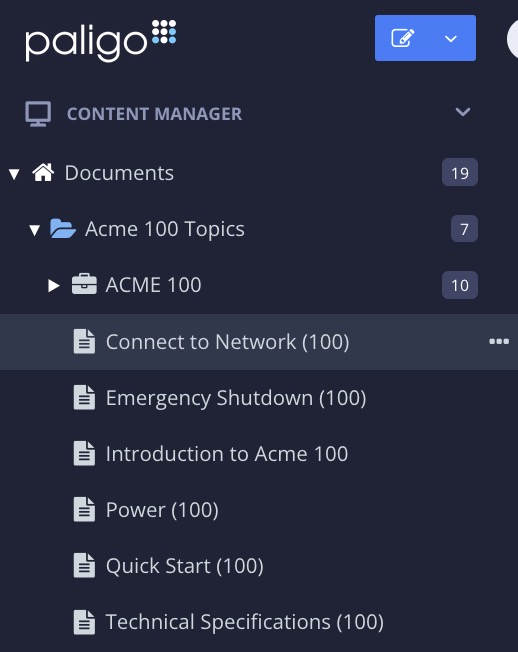
Example of a multi-level structure in a publication. Note that the topic Warranty has a Branching icon next to it.
Tip
If you have many related publications that you want to publish in the same HTML5 Help Center with a single hub page, see Multi-Publication Portal. We call this type of output a "parent publication portal".
In Paligo, you write your content in topics and organize them in a publication. You do not write anything in the publication. However, there are cases when you need to open it in the Editor, for example, to add a subtitle or edit the Publication Topic.
A publication is a structure (like a table of contents) where you add references (Forks) to a collection of topics that you want to publish as an HTML5 help center or as a PDF output. Use the publication to organize the content into a logical structure in the Structure View. A publication does not have to represent an entire user guide or online help system, it could be a smaller collection of topics, such as a chapter.
You can create your topics and publications in any order, but it is often easier to create the publication first, to be able to overview the content structure and to see what extra content is needed.
 |
Tip
For an introduction to topics and publications, see Topic-Based Authoring.
To create a new publication:
-
Select the Dotted menu (... ) to the right of the folder to store the new content in the Content Manager.
If a suitable folder does not already exist, you can create a new one (Create Folder).

-
Select Create content.
-
Name the content.
Note
The characters you can use for titles are: numbers, language characters, punctuation characters and spaces. The punctuation characters are:
! " # $ % / & ' ( ) * + , - . : ; < = > ? @ [ \ ] ^ _ ` { | } ~ -
Select the type of content to be created.

The checkbox for topic is preselected.
-
Select From template and select among existing Templates.
 Optional
 -
Select the Languages that you want to translate to later.

The original content will be labelled with the Source Language.
Tip
Select the one of the following checkboxes:
-
Open in editor in the lower left corner to start editing.
-
Create another in the lower right corner to continue creating content.
-
-
Select OK.
Paligo creates the publication and adds it to the selected folder in the Content Manager. It is shown with a briefcase symbol. 
 |
Tip
Once the publication is created: Add Content to a Publication and Organize a Publication.
When your publication is ready for release, see About Publishing.
Use a publication in Paligo to create the "table of contents" that you want to publish.
Open the publication's Structure View and drag and drop the content to it, copy and paste content, or create new content within the publication. Use Floating Content Panels to simplify drag and drop from separate parts of the Content Manager.
Every topic or publication that is to appear in the published output must be included in the publication. However, it is possible to hide content from the table of contents, see Exclude Content from Publication TOC.
You can select multiple topics or publications at a time. They will be added in the same order as they appear in the Content Manager. Hold down:
-
Shift key to select a range of topics or publications.
-
Ctrl / Cmd key to select topics or publications individually.
|
To add content to a publication:
-
Select the publication in the Content Manager.
-
Now you can:
-
Drag and drop topics from the Content Manager to the desired location in the publication structure. They will appear at the same level in the structure and will be added after the topic you selected. For each one that you add, Paligo adds a fork to the publication structure.

-
Drag and drop other publications from the Content Manager to the desired location in the publication structure. They will appear at the same level in the structure and will be added after the publication you selected. For each one that you add, Paligo add forks for the entire subpublication, including its topics.
-
Copy and paste content to the desired location in the publication structure.

-
Select your documents in the Content Manager.
-
Select the dotted menu (...) and choose Copy.

-
Open the publication structure and select the dotted menu (...) of the desired position and choose Paste.

-
Select whether to paste the content as:
-
Child - to add topic forks at the next level down in the structure and will be nested below the topic you selected.
-
After - to add topic forks at the same level in the structure and will be added after the topic you selected.
The documents are placed in the desired position.
-
-
-
Create new topics that are added to the publication structure automatically.
Tip
To control where new topics are stored in the Content Manager, select the arrow button next to the New topic button. Select Choose folder to browse to your preferred folder.

You can either use:
-
The New Topic button and enter the topic's name. A fork is added at the bottom of the publication structure and the new topic is added in the Content Manager. You can Organize a Publication afterwards.

-
The Dotted menu ( ... ) to the right of the publication content lets you position it the desired position at once.
-
Select the dotted menu ( ... ) of the desired position in the publication structure.

-
Select New followed by either:
-
Child to add a topic fork at the next level down in the structure. It will be nested below the topic you selected.
-
After to add a topic fork at the same level in the structure. It will be added after the topic you selected.


To the left - Use Child to create a subsection. To the right - Use After to create a new topic at the same level.
-
-
Enter a topic name.
-
Paligo creates a new topic and adds a fork to the topic in the publication structure.
-
-
-
Use the arrow buttons to arrange your topics and reused publications into the order you want. You can set them to display as a flat structure or you can "nest" topics and publications so they have a more complex structure, with multiple levels of content, see Organize a Publication.

-
Select Save to confirm the publication changes.

Note
Paligo does not create new topic forks in the publication structure until you select Save.
The best way to reuse a publication is to Reuse Forks and its "structure" between publications. This will help you save time when creating new publications and reduce the amount of work needed when updating the publication structures. To learn more, see About Reusing Content.
When you duplicate a publication, Paligo creates a new publication with the same content and the same name as the original, with "copy" and a number added at the end. The new publication is positioned below the original publication in the Content Manager. To learn more, see What Happens When a Publication is Duplicated?.
 |
Tip
To make different versions of a publication, you may prefer to use the branching feature. Branching is designed for creating multiple versions and allows you to make a copy that can later be merged back into the original. To find out more, see Branching.
To duplicate a publication:
-
Select the Dotted menu (...) to the right of the publication in the Content Manager.

-
Select Duplicate from the menu.
The duplicated publication ("copy 1") appears below the original publication in the Content Manager.

-
Select the dotted menu ( ...) for the copy and choose Rename.
-
Enter a new name for the publication duplicate.
-
You can now change the structure without affecting the original publication.
Tip
You can then edit the publication copy to meet your requirements. For more information, see:
-
Reuse Forks (for copying and pasting a fork)
When you duplicate a publication, Paligo creates a new publication with the same content and the same name as the original, with "copy" and a number added at the end. The new publication is positioned below the original publication in the Content Manager.
|
The duplicated publication has its own unique ID and is completely separated from the original publication. However, it does not duplicate the included content, because these are only Forks (links to the topics or subpublications).
Changes to the forks will affect both the original publication and its duplicate, as both use the same content forks. But it is possible to:
-
Delete forks from a publication without affecting the other publication.
-
Add forks to a publication without affecting the other publication.
-
Change the fork order in a publication without affecting the order in the other publication.
Note
To get a duplicated publication with duplicated forks, you need to duplicate the content and then add those forks to the publication.
That way, the duplicated publication will have different forks from the original.
 |
A publication contains links to topics called forks. It does not contain the actual topics.
On some projects, you may want to include topics in a publication, but stop them from appearing in the table of contents (TOC). For example, if you have a high number of topics, that could result in a large TOC that becomes a little overwhelming for people who are using your help center. So you might want to prevent some topics from being in the TOC, but still have them in the help center so that people can search for them.
To exclude a topic from the TOC, but still searchable in the help:
-
Select the topic or component in the Content Manager to open it in the Editor.
Alternatively, you can Create a Topic and edit that.
-
Select the
sectionelement in the Element Structure Menu.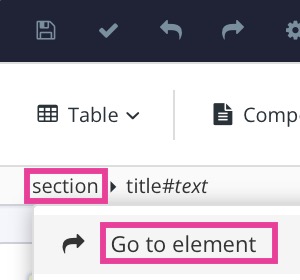
-
Select Go to element.
-
Add the
roleattribute n the Element Attributes Panel.
-
Set the value of the role attribute to
notintoc
-
Select Save.

-
Use the arrow buttons to arrange your topics and reused publications, see Organize a Publication.
When you publish the content, topics with role = notintoc are included in the publication, but will not appear in the table of contents.
A fork is a special type of link between a publication and a topic or subpublication. Paligo uses the forks when content is added to a publication.
The fork is just a reference from the publication to its content, which is stored elsewhere. This means that when you change the order of the topics in a publication, arrange them at different levels or remove content, you are just reorganizing a list of references and the order the content appear in the published output.
In many ways, it is similar to how cross-references work. When a cross-reference is added from one topic to another, you are adding a link between the topics. Paligo knows that the link leads from the current topic to another specific topic. It is a similar concept when you add content to a publication.
 |
Tip
To learn how to add topics to a publication, see Add Content to a Publication.
The cross reference dialog shows the targets both as part of the publication (fork) and outside the publication tree (topic or subpublication). When you insert a cross-reference in topics, you can link to either a topic or a fork. It is important that you understand the difference, as it will produce different results.
-
Topic

If the target topic for the link only appears once in the publication, then you can link to the topic. This creates a link that uses the
xml:idof the topic. To add a topic reference, select the topic with the black icon. Paligo recommends this approach because the links will work when content is reused in other publications and also for topic branches. -
Fork

If the target topic appears multiple times in the same publication, you should link to the fork instead. By linking to the "fork" you link to the position of the topic in the publication structure by using the
fork:id. To add a "fork" reference, expand the publication and select the "fork" with the grey icon. It is important to know that fork links only work within the publication they originate from.
 |
Paligo adds a cross-reference to the title of the selected topic or fork.
Tip
For more details, see Add Cross-Reference to Topic and Manually Create a Fork Link.
When you have a publication and you have added topics or other components to it, you can organize them into a logical order. When you publish, the structure of the publication is what the reader will see as the table of contents or navigation menu. You can create a content hierarchy so that there are sections and subsections. Use Chunking to Control Subsections to control how many levels of the content are shown in the table of contents.
To organize the content in a publication:
-
Select the publication in the Content Manager.

Paligo displays the publication's structure.
-
Select the topic or subpublication to be reorganized.
Press and hold Shift to select and move several topics or subpublications at the same time.
-
Use the arrows to move content up or down in the structure and different levels in the structure hierarchy.
Tip
You can also:
-
Drag and drop the content in the structure.
-
Use keyboard shortcuts to move content in the structure hierarchy.
-
Move left use Shift and Tab
-
Move right use Tab
-
Move up use Alt + ↑ (Windows) and Option ⌥ + ↑ (Mac)
-
Move down use Alt + ↓ (Windows) and Option ⌥ + ↓ (Mac)
-
-
-
Select Save to confirm the publication changes.
Let's say you have a publication and you add a "Pair with another device" topic and a "Turn Bluetooth on/off" topic. When you add the topics to the publication structure, they appear at the bottom of the structure. You want to move them so that they are subsections of a "Connecting via Bluetooth" topic.
 |
To move them, you press and hold the Shift key and then select both topics in the structure. Next, you use the up arrow icon on the "Pair with another device" topic to move both topics up until they are directly below the "Connecting via Bluetooth" topic.
 |
With the topics still selected, select the right arrow icon (or press Tab) to move the topics so that they are sub-sections of the "Connecting via Bluetooth" topic.
 |
With the topics now arranged in the structure you want, select Save to store the changes.
You can preview your publication by publishing as normal, but without making it public. It gives you the possibility to review both the structure and how the content appears in your customized output, see Set Preview Layouts.
By making a debug file, you can correct any broken links before going live.
Tip
If you are designing covers for PDF output, it might be easier to use the preview in the Layout Editor, see Preview a PDF Publication in Layout Editor.
To preview a publication via the Content Manager:
-
Select the dotted menu (...) for the topic or publication in Content Manager.

-
Select Publish.


Paligo displays the Publish document dialog.
-
Select the type of output (PDF, HTML, HTML5, Word, XML, eLearning or SCORM).
-
If needed, select languages, profiling attributes and variables.
-
Avoid Upload output (if you do not have a test area to publish to).
-
Select the checkbox Make a debug file to verify that are no broken links in the publication.
-
Select Publish document.
A zip file containing the published output appears in the
Downloadsfolder on your computer (unless you have altered your browser's settings to store downloaded files somewhere else) AND there will also be a link in the Dashboard feed to download the published content. -
First, unzip the file.
-
Open the
tmpfolder and select thelinkreport.
-
It opens up in your browser. If there are any link errors, it shows a list of the affected topics. Use it to mend the broken links.

-
Open the publication to view the published output to determine if there are any layout settings that need to be updated or if the publication structure needs to be reorganized.


To the left a PDF output. To the right an HTML output
-
Redo this instruction as many times as needed to get a flawless publication.
The PDF layout editor has a preview feature that you can use to preview individual topics or an entire publication. It is especially useful when you Design Covers for PDFs, as you can see the effect of changes you make in the layout settings. For example, you can see how the alignment of an "info element" affects the look of a front cover.
To preview a publication for PDF in :
-
Select Layout in the top menu.
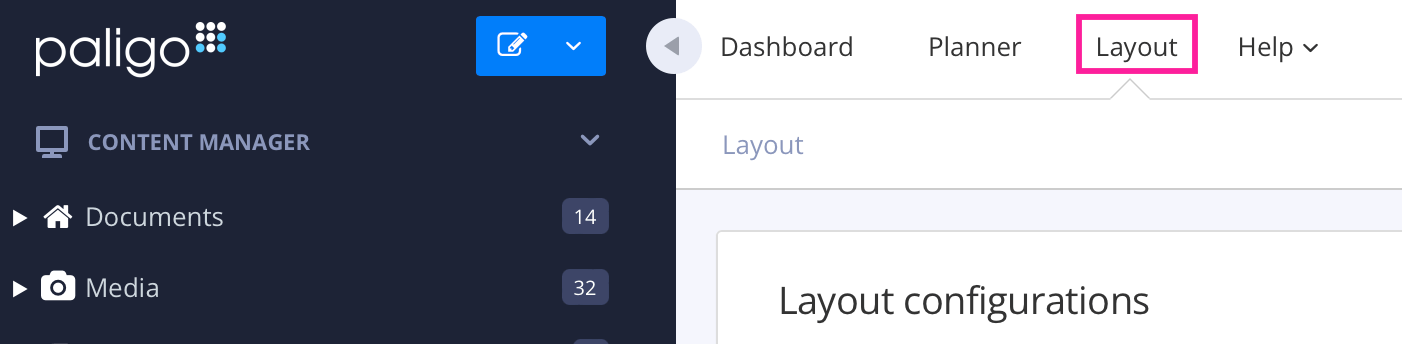
Paligo displays a list of Layouts. The list is empty if there are no custom Layouts in your Paligo instance.
-
Select the Layout you want to update or Create a Layout.
Tip
You can copy the URL of the Layout Editor and paste it into a new tab in your browser. This can be useful if you frequently switch between your Paligo content and the Layout settings.
-
Select Choose document and then choose the publication you want to preview.

Paligo loads the publication, including its covers into the preview pane.
-
Use the layout settings to make styling adjustments that will apply to the PDF output. For a list of the settings and references to documentation that explains how to use them, see PDF Layout Editor Options. When you have made the changes, select Update preview and Paligo will refresh the preview so that you can see the effect of the changes.

Paligo shows the preview (1). Make your changes in the settings (2) and then select Update Preview (3) to see the effect.
-
Select Save.
Each "fork" in a publication structure has a menu. To access it, position the cursor over a fork and then select the dotted menu ( ...).
 |
The menu contains these options:
-
New
Use to create a new topic and add a fork to it in the publication structure, see Add Content to a Publication.
-
Paste
Use to add a copy of a fork to a publication structure, see Reuse Forks in the Same Publication.
-
Copy
Use to make a copy of a fork in a publication structure, see Reuse Forks in the Same Publication. You can then paste the copy elsewhere in the publication structure.
-
Edit
Use to open the topic.
-
Remove
Use to remove a fork from the publication structure, see Remove Content from a Publication.
Every publication in Paligo automatically gets its own "front matter" called Publication Topic. This topic is used for the front cover, publication date, version number and author details. You can add and delete elements according to own needs.
-
For PDF publications, the "front matter" provides some or all of the content that is on the front cover and any pages that come before the table of contents. Learn more, see Design Covers for PDFs .

A publication could have a background image, title, and logo to create a front cover for a PDF.
-
For HTML outputs, the "front matter" is content that appears on a web page. You can access the page by selecting the link to the publication in the breadcrumb at the top of the topic. Learn more, see Themes for HTML5 Help Centers .

The HTML output front matter
Tip
Learn more about styling the publication, see Style and Customize your Outputs.
Note
For reused publications, there are settings in the HTML layout that you can use to control the publication topics.
As a Paligo author, you can edit the publication topic to control what information that appears in the "front matter". To display or edit a publication topic, see Display a Publication Topic and Edit a Publication Topic.
 |
A publication topic has article as the top-level element instead of section. Inside the article element is an info element. The "front matter" elements need to go
inside the info element. We use the term "info elements" to describe these elements collectively.
By default, Paligo includes the title, subtitle, mediaobject, volumenum, pubdate, copyright,
legalnotice, and abstract elements inside the info element.
You can enter values for these elements, add other info elements, and remove any info elements you do not want to use.
Note
The mediaobject is set to have a role attribute with the value set to titleimage. This role and value is needed to make the image a cover image.
 |
When you have set up your publication topics, you can use the layouts and CSS to control how Paligo processes them and styles them in the output.
-
For PDF output use the settings in the PDF layout, see Style the Info Elements.
-
For HTML5 output use the settings in the HTML5 layout and CSS. To learn how to view the styles in the HTML, make changes and upload CSS, see Style with CSS.
A publication topic has article as the top-level element instead of section. Inside the article element is an info element. The "front matter" elements need
to go inside the info element. We use the term "info elements" to describe these elements collectively.
By default, Paligo includes the title, subtitle, mediaobject, volumenum, pubdate, copyright, legalnotice, and abstract elements inside the info element.
You can see this structure in the XML tree panel:
 |
There are also other elements that you can add, depending on your requirements. To learn how to access the various elements that are available, see Edit a Publication Topic. You can also Remove Info Elements as long as they are optional elements.
Note
By default, Paligo presents the info elements in a fixed order. This may not match the order of the elements in your publication topic. But you can set the published version to match the order shown in the editor. To find out more, see Order of Info Elements
Tip
To find out more about each of the elements, refer to the DocBook standard, where you can find descriptions and information about the structure.
The name of the publication. This is a required element that is included by default and supported in PDF and HTML outputs.
In publication topics, the top-level element is article rather than section (regular topics have section as the top-level element). Then it has the info element, and inside this, the title element.
The following example shows the structure when title is the only info element being used.
<article>
    <info>
        <title>Acme 100X user guide</title>
    </info>
</article>
Typically, you would set up a publication topic to include many other info elements, including copyright, publish date, and edition. These would all be at the same level as
title inside the info element.
A secondary heading for the publication, often used for describing the purpose of the document or for a strapline. For example, the document title could be "Acme Series 100X" and the subtitle could be "Developer Guide". This is an optional element that is included by default and supported in PDF and HTML outputs.
To use the subtitle element, add it inside an info element in a publication topic. Typically, it is used immediately after a title element (so both the title and subtitle are inside info). If other info elements are also included, those are also added inside the info element.
<info>
    <title>Acme 100X user guide</title>
    <subtitle>Operation and maintenance</subtitle>
</info>
Use to add a foreground image. It is intended for use as a product image, but it can be any image. This is an optional element that is included by default and supported in PDF and HTML outputs.
To find out more about adding images for the front pages, see Cover Foreground Images and Cover Background .
Note
If you have a foreground image in the publication topic, it takes priority over any product image that is set in a layout.
Use to add the date of publication to a document. You can enter the date manually, use a variable, or set Paligo to insert the date automatically. This is an optional element that is included by default and supported in PDF and HTML outputs.
The following example shows the date entered as text inside the pubdate element. The pubdate element has to be inside the info element in the publication topic. Typically, there will
also be other elements inside the info element too, such as title and subtitle.
<info>
    <title>acme 100X user guide</title>
    <subtitle>Operation and maintenance</subtitle>
    <pubdate>May 17 2022</pubdate>
</info>
Here, the text is typed in manually, but you could use a variable for the date if you prefer.
You can also set Paligo to add the date of publication automatically. For this, make sure that the pubdate element is in the publication topic and also that it is empty (has no text or variable value).
<info>
    <title>acme 100X user guide</title>
    <subtitle>Operation and maintenance</subtitle>
    <pubdate></pubdate>
</info>
Paligo will add the publication date automatically as long as you add a date value to:
-
General > Today's date for publication date in your HTML layout
-
Front page > Info elements > Today's date for publication date in your PDF layout.
If the pubdate element contains a value, that value is shown and the layout settings are ignored. If there is no date in the pubdate or the layout settings, the publication date is excluded from the output.
Use to add copyright details to the publication. This is an optional element that is included by default and supported in PDF and HTML outputs.
The following code shows the correct structure for a copyright entry. Note that the copyright element has to be inside an info element, along with other info elements such as title.
The year and holder are inside the copyright element.
<info>
    <title>Acme 100X user guide</title>
    <copyright>
      <year>2022</year>
      <holder>Acme Enterprises</holder>
    </copyright>
</info>
In the output, the copyright part appears as:
 |
Use to add legal information such as disclaimers and statements regarding liability. This is an optional element that is included by default and supported in PDF and HTML outputs.
The following example shows the correct structure for a legal notice. When you add the legalnotice element, it has to be inside an info element, along with any other info elements such as title. Also, you need to add another element inside it to contain the text, such as a para element.
<info>
    <title>Acme 100X user guide</title>
    <legalnotice>
        <para>All pertinent state, regional, and local safety regulations must be observed when installing and using this product. For reasons of safety and to help ensure compliance with documented system data, only the manufacturer shall perform repairs to components. Failure to observe this information can result in injury or equipment damage.</para>
        <para>All rights reserved. No part of this publication may be reproduced, distributed, or transmitted in any form or by any means, including photocopying, recording, or other electronic or mechanical methods, without the prior written permission of the publisher. For permission requests, write to the publisher, addressed “Attention: Permissions Coordinator,” at the address below.</para>
    </legalnotice>
</info>
Use to add a summary of a publication and or topic. The abstract is also used as the meta description for the publication in HTML outputs. This is important for Search Engine Optimization (SEO) if you are making your HTML content available to Internet search
engines.
This is an optional element that is included by default and supported in PDF and HTML outputs. You can also add it to individual topics (inside an info element) to provide meta descriptions for each topic.
To use an abstract element in a publication topic, add it inside the info element (alongside other info elements, such as title). Then add an element inside the abstract element to contain the text, for example, a para element.
<info>
    <title>Acme HomeHub User Guide</title>
    <abstract>
        <para>Learn how to use the Acme SmartHome hub to manage your household devices from your phone.</para>
    </abstract>
</info>
Use to add the address of an organization. This is a verbatim element, so any formatting you apply, such as line breaks, is kept in the output. You can enter the entire address directly in the address element or you can add its "child" elements, such as
street and city to create a more structured address.
This is an optional element that is supported in PDF output.
To use the address element and its child elements for each part of the address, add them in a structure inside the info element. The address element is at the same level as other info elements, such as title.
The following code shows an example:
<info>
    <address>
        <street>1A Main Street Business Estate</street>
        <city>Randomtown</city>
        <state>NY</state>
        <postcode>12345</postcode>
        <country>USA</country>
    </address>
</info>
The benefit of this approach is that, if needed, you can reference each part of the address in other topics.
If you enter the address as regular text, the structure is much simpler:
<info>
    <title>Acme 100X user guide</title>
    <address>
        1A Main Street Business Estate
        Randomtown
        NY
        12345
        USA
    </address>
</info>
With this simpler approach, you can only reference the entire address in other topics.
Note
The address element is a verbatim element and so preserves any formatting and line breaks. But if it is referenced by a dynamic variable, the dynamic variable will insert the address content as plain text with no formatting.
Use as a container for author elements when you want to list more than one author. You can then add multiple author elements inside the authorgroup. This is an optional element that is
supported in PDF and HTML outputs.
The following code shows an example of the structure needed if you are using authorgroup to contain details of multiple authors. The authorgroup element has to be inside the info
element, at the same level as other info elements such as title. The author elements are then nested inside the authorgroup element.
<info>
<title>Acme 100X user guide</title>
<authorgroup>
    <author>
        <personname>Richard Greenwood</personname>
    </author>
    <author>
        <personname>Leanne Matthews</personname>
    </author>
</authorgroup>
</info>
If there is only one author, there is no need to use authorgroup:
<info>
    <title>Acme 100X user guide</title>
    <author>
        <personname>Richard Greenwood</personname>
    </author>
</info>
To name an organization as the author rather than an individual, use the orgname element:
<info>
    <title>Acme 100X user guide</title>
    <author>
        <orgname>Acme Enterprises</orgname>
    </author>
</info>
Use to add the name of the author to a document. You can enter the name manually or use a variable. This is an optional element that is supported in PDF and HTML outputs.
For examples of the structure for author elements, see Authorgroup.
Use to add information about the version of the document. We recommend that you use edition instead of volumenum for this type of information. This is an optional element that is supported in PDF output.
Use the edition element inside the info element, along with any other info elements such as title. The structure should look like this and you can
enter the edition information directly into the edition element.
<info>
    <title>Acme 100X user guide</title>
    <edition>Acme 100x/PBD-10003</edition>
</info>
By default, when you publish to PDF, the edition is shown with the word "Edition" after it. The "Edition" is an auto-label and you can remove it by changing the auto-label setting in the PDF layout (see Set Auto-Labels for Info Elements).
Use to credit a person other than the author or editor. This is an optional element that is supported in HTML output.
To use the othercredit element, add it inside the info element alongside other top-level info elements such as title. Inside the othercredit element, add a child element to contain the credit information, for example, you could add personname (other child elements are available).
The structure should look like this:
<info>
    <title>Acme 100X user guide</title>
    <othercredit>
        <personname>Sara Card</personname>
    </othercredit>
</info>
Use to provide a brief description of a publication release. For example, the release information may explain that the document is for a particular version of a product. This is an optional element that is supported in PDF and HTML outputs.
To use the releaseinfo element in a publication topic, add it inside the info element alongside any other info elements such as title. You can then add the release details directly
inside the releaseinfo element.
<info>
    <title>Acme 100X user guide</title>
    <releaseinfo>Documentation update to include added humidity controls.</releaseinfo>
</info>
Use to add a table that contains a row for each revision to the document. You can add revisions to the list manually, and include information about the changes you have made. This is an optional element that is supported in PDF and HTML outputs.
Although revhistory is an "info" element, you should not use it in the publication topic. Instead, you should create a regular topic for the revision history and add an info element to it, and then add the revhistory and revision elements inside that. For details see Revision History Topic.
By default, Paligo uses a fixed order for the elements in publication topics. When you publish, Paligo will present the elements in this order:
-
title -
subtitle -
mediaobject -
authorgroup -
author- This is added as a child of theauthorgroupelement. -
volumenum -
pubdate -
edition -
abstract -
copyright -
legalnotice -
address -
releaseinfo
Any other info elements that you add will appear in the same order that they are shown in the publication topic. Child elements are shown in order after their parent, for example, personname will appear as a child of the author element, so will appear before
volumenum.
To change the order for an HTML output, create a custom JavaScript that will move the elements. Then upload the JavaScript file to your HTML layout and publish again (see Upload Customized JavaScript).
For PDF outputs, you can set Paligo to use a free order instead of fixed (see Set the Order of Info Elements). With a free order, the info elements are shown in the same order that they appear in the publication topic .
To help you understand the correct structure for the info elements, we have included a sample publication topic. The example shows the underlying XML so that you can see how the various info elements, such as copyright and pubdate,
are structured and positioned inside the info element.
To learn how to add and remove info elements in your own publication topics, see Edit a Publication Topic.
Here is an example of an entire publication topic. Note that we have removed the XML IDs so that the structure is clearer to view. When you create your own publication topic, you will have XML IDs included as well as other XML data.
<?xml version="1.0"?>
<article>
    <info>
        <title>Acme HomeHub User Guide</title>
        <subtitle>The smarter way to manage your home</subtitle>
        <mediaobject role="titleimage">
            <imageobject>
                <imagedata fileref="UUID-4352d337-29fd-6ee2-e88c-e04bed3ce898" xinfo:image="UUID-4352d337-29fd-6ee2-e88c-e04bed3ce898"/>
            </imageobject>
        </mediaobject>
        <volumenum>ACME-SH-123456-A1</volumenum>
        <edition>ACME 100X PBD-10003</edition>
        <pubdate>May 17 2022</pubdate>
        <copyright>
            <year>2022</year>
            <holder>Acme Enterprises</holder>
        </copyright>
        <legalnotice>
            <para>All pertinent state, regional, and local safety regulations must be observed when installing and using this product. For reasons of safety and to help ensure compliance with documented system data, only the manufacturer shall perform repairs to components. Failure to observe this information can result in injury or equipment damage.</para>
            <para>All rights reserved. No part of this publication may be reproduced, distributed, or transmitted in any form or by any means, including photocopying, recording, or other electronic or mechanical methods, without the prior written permission of the publisher. For permission requests, write to the publisher, addressed “Attention: Permissions Coordinator,” at the address below.</para>
        </legalnotice>
        <address>Acme Enterprises
            <street>1A Main Street</street>
            <city>Generic City</city>
            <postcode>123 456</postcode>
            <country>USA</country>
        </address>
        <authorgroup>
            <author>
                <personname>Richard Greenwood</personname>
            </author>
            <author>
                <personname>Leanne Matthews</personname>
            </author>
                 <orgname>Acme Enterprises</orgname>
            <author>
            </author>
        </authorgroup>
        <releaseinfo>v16.1 release includes documentation for humidity monitoring and controls, extended range of supported lighting systems, and how to order replacement parts.</releaseinfo>
        <abstract>
          <para>Learn how to use the Acme SmartHome hub to manage your household devices from your phone.</para>
        </abstract>
</info>
</article>
By default, the publication contains an article element, an info element, and then inside that, several other elements, including subtitle, copyright, and
publication date. We use the term "info elements" to refer to these lower-level elements collectively, as these type of elements must all be inside the info element. Learn about the info elements, see Supported Info Elements.
You can make changes to the publication topic so that it meets your requirements, see Edit a Publication Topic and Images in a Publication Topic.
To display the publication topic for one of your publications:
-
Select the Dotted Menu (...) for the publication in Content Manager.

-
Select Edit and choose Open in editor.
Paligo opens the publication topic.
When you create a publication, Paligo adds some commonly used "info elements" to the publication topic, such as copyright and pubdate. There are other elements that you can add too, including authorgroup, author and edition.
If you do not want a Publication Topic to be clickable in the TOC sidebar or Breadcrumb Homepage Link, see Make Topics Non-clickable Labels (HTML5).
Tip
To help you understand the correct structure for a publication topic, we have included a sample, see Example Publication Topic Structure. The sample shows the XML for a valid publication topic and includes many of the available info elements.
To edit a publication topic:
-
Establish which elements you want to include or exclude, see Supported Info Elements.
-
Select the Dotted Menu (...) for the publication in Content Manager.
-
Select Edit and choose Open in editor.
Paligo opens the publication topic.
-
Remove elements not needed.
-
Position the cursor where the new element is to be inserted inside the
infoelement. -
Press Alt + Enter ⏎ (Windows) or Command ⌘ + Enter ⏎ (Mac) to display the Element Context Menu.
-
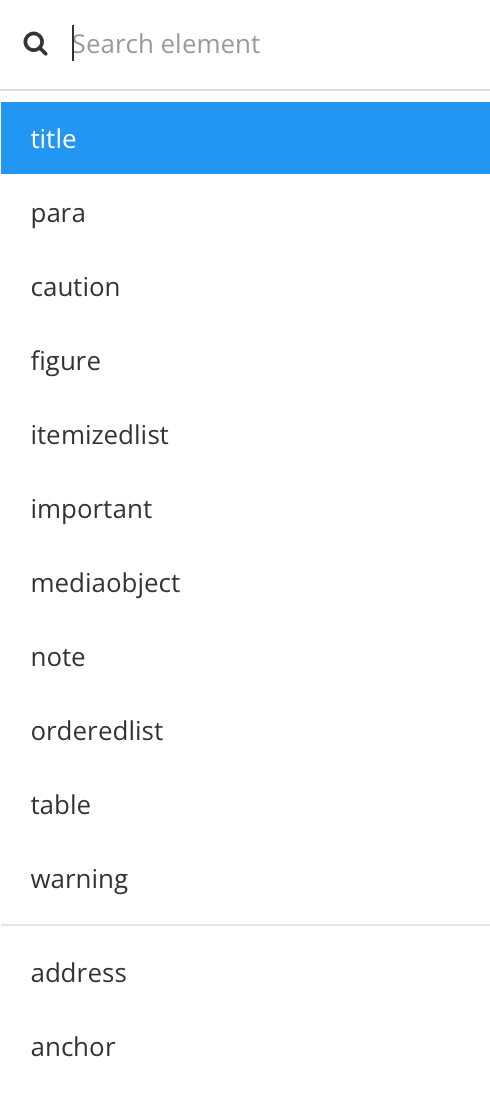
Scroll down the menu and add needed elements.
The menu provides access to all of the valid elements for the selected position. While the elements are valid, Paligo does not make use of them all and some may be excluded from the output. You should only use the elements that are supported (see Supported Info Elements).
Note
For some elements, you will need to apply a certain structure, for example, if you want to credit multiple authors, you will need to use
authorgroupandauthorelements. Other elements, such ascopyright, have additional child elements, such asyearandholder. See the examples for details. -
When you add an element, it is empty by default. You need to define the value that is going to be shown in the output. This could be:
-
Regular text - This is known as "hard coding" as the text is added to the topic and to change it, you would need to edit the topic.
-
Variable - These are containers for text that is defined elsewhere (in a variable set). The benefit of this approach is that you can use a variable set to modify or change multiple publications from one place. There is no need to edit each publication separately. To find out more, see Variables.
-
Dynamic variable - These are special types of variable that take their value from either the client session or from other elements in your content. For example, you could set the copyright year to always use the year that the publication was published. To find out more, see Dynamic Text Variables.
-
An image file (for
mediaobjectstructure).
Note
For the
pubdateelement, you can set Paligo to insert the date automatically. For details, see Change Publication Date and Time Format (PDF). -
-
Select Save.
-
If you are publishing to PDF, check that the element(s) are set to be included in the output when published.
-
Select Layout in the top menu.
Paligo displays a list of Layouts. The list is empty if there are no custom Layouts in your Paligo instance.
-
Select the Layout you want to update or Create a Layout.
Tip
You can copy the URL of the Layout Editor and paste it into a new tab in your browser. This can be useful if you frequently switch between your Paligo content and the Layout settings.
-
Select Front Page in the sidebar.


-
Select Info elements.
-
Make sure that the appropriate Render <element name> element on this side of the front cover setting has a value of recto (front page) or verso (reverse side).

Note
Some elements are set to none by default, meaning that they will not be included in the output unless you change them to recto or verso.
-
Select Save.
-
Tip
When you publish your publication, it will include the info elements. To learn how to style the info elements, such as setting font colors and positioning content on the front cover or on the reverse side, see:
-
Style with CSS - For HTML outputs, create a custom CSS file with styles to define the look and feel that you want, then upload it to the HTML layout and publish it again.
Most of the elements in a publication topic are optional, so you can add and remove elements to design a publication topic to meet your requirements. For any elements that you do not want to use, select the element in the main flow of the text, and then select it in the element structure menu. From the menu that appears, select Delete.
 |
Note
If you remove an element that is required, Paligo will warn you about this when you save the topic. You will see the message in a pop-up dialog and also in the Validation panel. You will only get the invalid content message if validation is enabled in your editor (see Validation).
 |
By default, the publication topic contains the structure for a single image. The image will automatically be used as the Product Image on the front page, as its mediaobject has a role attribute with titleimage
as the value. Only the structure for the image is in place, so you will see a red question mark. To insert an image into the existing structure, see Add
Image to Publication Topic.
 |
The image structure consists of:
<mediaobject role=“titleimage”>
    <imageobject>
        <imagedata/>
    </imageobject>
</mediaobject>
You can also insert additional images in the publication topic, either by using the Insert > Image option or by dragging and dropping an image from your desktop onto the topic.
When you add new images, they use the regular mediaobject > imageobject > imagedata structure and do not have a role
set. They will appear after the product image, in the order they appear in your topic. They are not affected by the product image styles in the layout or any CSS.
Important
Only one image in the publication topic can have the role attribute value set to titleimage.
 |
If multiple images have this value, they will appear stacked on top of each other in the same position in PDF output.
You can turn a foreground image into a background image for the cover by adding the role attribute with the value bg-image, see Methods for Adding a Background Image to a Cover.
Tip
When you have added an image and set it as the product image, you can control its styling in the output by using the layout settings (PDF) or CSS (HTML). For details, see:
Every publication in Paligo has a Publication Topic that acts as a container for the front page. It is usually set up to include an image for the front cover, details about the author, copyright information and similar content, see Supported Info Elements. This also applies to subpublications, which are publications reused as sections inside a parent publication.
In the image shown below, there is the main publication named "ACME Smart Home" and it contains a mixture of topics and subpublications. Each publication and subpublication has its own "publication topic".
-
For PDF outputs, Paligo only includes a publication topic for the top-level publication (the main publication). It excludes the publication topics for any subpublications so that the "front matter" only exists at the start of the PDF file.
-
For HTML outputs, you can choose whether the output includes publication topics for both the top-level publication and the subpublications OR only for the top-level publication.
|
Note
A reused publication (subpublication) gets a different symbol in the publication structure. 
For HTML outputs, you can choose whether the output include publication topics for both the top-level publication (main publication) and the subpublications OR only include a publication topic for the top-level publication (parent publication).
Before you can adjust the layout settings, you have to Create a Layout.
-
Select Layout in the top menu.
Paligo displays a list of Layouts. The list is empty if there are no custom Layouts in your Paligo instance.
-
Select the Layout you want to update or Create a Layout.
Tip
You can copy the URL of the Layout Editor and paste it into a new tab in your browser. This can be useful if you frequently switch between your Paligo content and the Layout settings.
-
Select General.
-
Use Create a title topic for reused publications to control whether publication topics are included for subpublications for HTML5.

-
Choose Enable to include a publication topic for both the main publication and each sub-publication.
-
Choose Disable to only include a publication topic for the main publication. The publication topics for subpublications will be excluded.
Important
This setting needs to be enabled for the filtering to work for the parent publication.
Tip
For HTML this setting is called Create a topic for reused publications.
-
-
Use Only create topic for reused publications if no top-level topic to include or exclude the publication topics.
-
Choose Enable to use the top-level topic as a publication topic for the subpublications.
If enabled, you must remember to link to a topic in the subpublication, not to the subpublication itself.
-
Choose Disable to use the regular publication topic for the subpublications.

Note
Paligo ignores this setting if your content does not match the criteria for the scenario. This setting requires that you have:
-
Enabled Create a title topic for reused publications.
-
Reused a publication that contains one top-level topic and the rest are nested low-level topics.

Example shows "Acme Smart Home" publication has a subpublication. The subpublication has a single top-level topic called "Lighting". The other topics in the subpublication are nested at a lower level.
-
-
Select Save.
To remove a topic, reused publication, or other component from a publication's structure:
-
Select the publication in the Content Manager.

Paligo displays the Structure View, which consists of three sections: Structure, Metadata and Preview.
-
In the publication structure, select the fork to the component that you want to remove.
Note
A fork is a reference from the publication's structure to a component, such as a topic, in the Content Manager. The fork is only the reference to the component. It is not the actual component.
Paligo adds a blue highlight to the selected fork.
-
Either:
-
Press Backspace or Delete
-
Select the dotted menu ( ... ) for the fork and then select Remove.

Paligo removes the fork (and any of its "children") from the publication.
-
-
Select Save to confirm the publication changes.
Note
When you remove a component from the publication structure, you only remove the publication's reference to the component (the "fork").
The component still exists in Paligo, it is just no longer included in your publication. You can find the component by searching or navigating the content in the Content Manager.
If the content has taxonomy labels, you can also use the Taxonomy Tag Options to find it.
Each time you save changes to a publication's structure, Paligo stores a record of the publication at that point in time. These records are the "revisions" and you can revert back to any available revision. For example, let's say you make changes to the structure of a publication on July 1st, but you then change your mind and want to revert back to how it used to be. By using the Revisions feature, you can change the publication's structure back to how it was on an earlier date.
When you use the Revisions feature, it is only the structure of the publication that changes. Paligo does not revert the content in the publication's topics.
Note
It is possible that you could revert back to a revision of a publication that links to topics that no longer exist, as they have been deleted. In this scenario, Paligo will recreate those topics, and try to add as much of the metadata as possible, including the ID. If the metadata ID is added to the topic, you may be able to use Revert a Topic to a Previous Revision to restore the topic's content. If not, you will need to add the content manually.
To revert back to an earlier publication revision:
-
Select the publication in the Content Manager.
Paligo displays the publication's structure.
-
Select the Revisions button at the bottom of the Structure view.


-
Select the link in the date column to preview the publication structure for a certain revision in the Preview panel.
-
Select Revert to restore a revision.
Paligo will restore the publication revision that you selected.
Tip
Two useful features in the Revisions view:
To delete a revision from the Revisions view, select Remove revision at the bottom of the Preview panel.
To manually save the latest structure update, select Create a revision at the bottom of the Revisions view.