Working with Assignments
An assignment is a request to other users (or user groups) to contribute to the content in some way. There is usually a timescale for the work to be completed.
Assignments offer several benefits:
-
Assignments are tracked in Paligo, so there is an audit trail of who worked on them and when, see Assignment Workflow and States and Workflow Status.
-
You can view the progress of assignments in the Planner or Dashboard, see Track the Assignment Progress.
-
You can set Paligo to change the status of your content automatically when a review assignment starts and ends, see Assignment Settings.
There are different Assignment Types, including reviews, contributions, and translations.
Also, you can have multiple assignments for the same content. This can result in several users trying to access the content at the same time. When this happens, the Contributor Editor displays a warning telling the user that the topic is already checked out by someone else. That user's avatar is shown to the right of the topic.
 |
Note
When you Add Users and Create a User Group , it is the User Types that determine which types of assignments you can allocate (see Create Assignments). Also, if you use Permissions, you can restrict access to certain folders or components.
Caution
Use assignments to collaborate with others and manage your projects and workflow. There are several types of assignments, each with a different purpose. They are called Review, Contribution, Translation, and Translation Review.
Review Assignment
 Use review assignments when you want someone to read your content and provide feedback as comments. For example, you could send a review assignment to an SME (subject matter
expert) to check for technical accuracy or proofreading. To learn more, see Create Assignments.
Use review assignments when you want someone to read your content and provide feedback as comments. For example, you could send a review assignment to an SME (subject matter
expert) to check for technical accuracy or proofreading. To learn more, see Create Assignments.
Contribution Assignment
 Use Contribution assignments when you want someone to create content, edit existing content or provide suggestions. For example, a project manager could assign some topics
to an expert and request the expert to write a draft of the content.
Use Contribution assignments when you want someone to create content, edit existing content or provide suggestions. For example, a project manager could assign some topics
to an expert and request the expert to write a draft of the content.
The actions that are available to the assignee vary, depending on the User Types that are assigned to their user account, see Create Assignments.
-
Users with an Author license can create and edit content in Paligo's main Editor, but also have access to all views in Contributor Editor.
-
Users with a Contributor license can only access the Contributor Editor.
Translation Assignment
 Use for managing translations, creating translation packages, and / or post-edit translations. Or even translate directly in Paligo by using the translation editor. To learn
more, see Create a Translation Assignment.
Use for managing translations, creating translation packages, and / or post-edit translations. Or even translate directly in Paligo by using the translation editor. To learn
more, see Create a Translation Assignment.
Translation Review Assignment
 Use Translation Review assignments when you want someone in your organization to proof-read a translation and leave comments as feedback. To learn more, see
Create a Translation Review Assignment.
Use Translation Review assignments when you want someone in your organization to proof-read a translation and leave comments as feedback. To learn more, see
Create a Translation Review Assignment.
Each assignment has its own workflow and state, which begins with Draft or Started, and then ends with Finished (needs work) or Finished (approved).
-
Draft - Started - Finished
-
Started - Finished
Note
The assignment goes through these states wherever the assignment takes place in the Workflow Status. For example, if you have a translation assignment, it will take place in the "In Translation" stage of the production workflow and will go from Started to Finished within that "In Translation" stage.
For each stage in the assignment workflow, there is a matching state. There are also response states for each assignee. You can view these states on Planner and in the Assignments Panel.
In the following descriptions, we have included the assignee response states as variations on the started and finished states, for example, there is a finished (needs work) state and a finished (approved) state.
-
Draft - The assignment has been created but its start date is in the future. It will switch to "started" automatically on the start date and will then appear on the assignee's dashboard too. Draft assignments appear as a transparent bar in the Planner.

-
Started - The assignment has been created and the assignee has been notified. Started assignments appear as a solid color bar in the Planner.

-
Started (needs work) - The assignment is allocated to multiple people and is set to finish only when they have all responded. Out of the users who have responded, at least one person has chosen to finish with the "needs work" state. There are still some users who have not responded yet.

You may also see this state if the assignment is set to only finish when all users approve the content. If one or more users finish with the "needs work" state, the assignment will not go to the finished state, as it can only do that when all users approve the content.
-
Started (approved) - The assignment is allocated to multiple people and is set to finish only when they have all responded. Out of the users who have responded, at least one person has chosen to finish with the "approved" state. But there are still other users who have not responded yet.

-
Finished (needs work) - The assignee has completed the assignment and they believe the content needs additional work before it can be released. A writer, contributor, or translator should work to improve the content and then send it for approval in a new assignment. Finished (needs work) assignments show as semi-transparent bars with a red stop symbol next to the assignee's avatar.

-
Finished (approved) - The assignee has completed the assignment and approved the content. They are satisfied that the content is suitable for publication. Finished (approved) assignments are shown as semi-transparent bars with a green check symbol next to the assignee's avatar.

Note
The assignments are color-coded too, with purple for review assignments, gray for contribution assignments, and blue for translation assignments. You can view these states on the Planner and in your Assignments Panel, see Track the Assignment Progress).
Finished assignments are shown as semi-transparent.
There is an avatar for each assignee, and it has an icon to show the assignee's response.
 |
|
Question mark |
The assignee has not responded yet. To be able to remove a former status, choose Reset my status. |
|
|
Green checkmark |
The assignee has finished the assignment and set the content to Approved. Set the status to Update to approved. |
|
|
Red Minus symbol |
The assignee has finished the assignment and set the content to Needs work. Set the status Update to needs work. For translation assignments, "Needs work" is replaced by "Declined". |


Note
You can set Paligo to change the state of your content (in the production workflow) automatically when a review assignment starts or finishes. For example, you can set a publication to automatically switch from "Work in Progress" to "In Review" when a review assignment begins. To set these automatic changes, use the Assignment Settings.
We recommend that you check the default settings for assignments and change them if they are not appropriate for your needs.
The default settings affect what:
-
Actions Paligo should take when an assignment begins
-
Actions Paligo should take when an assignment ends
-
Notifications Paligo should send to assignees.
There are two ways to access the Default Settings:
-
Planner - Make general assignment settings. Before you start working with assignments, it is a good idea to review the default settings as you can use them to make your workflow more efficient.

-
Create Assignments - Adjust the default settings when the assignment is created.

The Default Settings for assignments are organized into the following tabs:
 |
-
General - Applies to all assignments. Use the settings here to get Paligo to:
-
Review assignments - Only applies to review assignments. Use the settings here to get Paligo to:
-
Comments - Applies to comments that are left by assignees in your assignments. Use the settings here to get Paligo to:
-
Contributions - Only applies to contribution assignments. Use the settings here to get Paligo to:
Paligo can automatically archive any comments in the content used for an assignment. The comments can be auto-archived at the start of the assignment or the end. Alternatively, you can set Paligo to never auto-archive the comments.
-
Use one of the two ways to access the Default Settings:
-
Planner - Make general assignment settings. Before you start working with assignments, it is a good idea to review the default settings as you can use them to make your workflow more efficient.
-
Create Assignments - Adjust the default settings when the assignment is created.
-
-
Select the Comments tab.

-
Define what Paligo should do with any existing comments When the assignment starts:
-
Archive comments to automatically archive any existing comments in the content for the assignment.
-
Don't archive comments to not automatically archive any comments that already exist.
-
-
Define what Paligo should do with comments When the assignment ends:
-
Archive comments if assignment has been approved to automatically archive comments when all assignees have approved the content.
-
Don't archive comments to not automatically archive any comments that already exist.
-
-
Select OK to confirm your choices.
Paligo can automatically switch the status of your content when you create a new assignment. This is a useful time-saving measure, as it means you do not have to change the status manually. For example, if you create a review, Paligo will automatically change the status of the selected content to In Review.
Note
Setting up automatic state changes for the workflows can be convenient, but should be considered carefully. In some situations, it can be preferable to change the state manually, for example, if you have many different variants reusing the same topics. In this scenario, changing the state manually gives you more precise control over the stages of the variants.
See more about the effects of workflow state changes in different scenarios here: Change Workflow for Reused Content.
To set Paligo to change the status automatically when a new assignment begins:
-
Use one of the two ways to access the Default Settings:
-
Planner - Make general assignment settings. Before you start working with assignments, it is a good idea to review the default settings as you can use them to make your workflow more efficient.
-
Create Assignments - Adjust the default settings when the assignment is created.
-
-
Select the General tab.

-
Use the Change the document release status box to control the workflow status:
-
Check the box to automatically change the workflow status when the assignment begins.
-
Clear the box to change the workflow status manually.
-
-
Select OK to confirm your choices.
Paligo can automatically change the state of your content when a review assignment finishes. By setting this up, you can avoid having to change the status manually.
To set the automatic state changes, you must understand the stages of the production workflow: Work in progress > In Review > In Translation > In Translation Review > Released
These are the stages that your content goes through from creation to publication. Your review assignments take place in the In Review stage.
Note
Setting up automatic state changes for the workflows can be convenient, but should be considered carefully. In some situations, it can be preferable to change the state manually, for example, if you have many different variants reusing the same topics. In this scenario, changing the state manually gives you more precise control over the stages of the variants.
See more about the effects of workflow state changes in different scenarios here: Change Workflow for Reused Content.
To set Paligo to change the state of your content when a review is finished:
-
Use one of the two ways to access the Default Settings:
-
Planner - Make general assignment settings. Before you start working with assignments, it is a good idea to review the default settings as you can use them to make your workflow more efficient.
-
Create Assignments - Adjust the default settings when the assignment is created.
-
-
Select the Review assignments tab.

-
Check the Change the document release status box.

Warning
If you are using Translation Review Assignments, do not use this setting.
It changes the release status for the document as soon as one translation reviewer has responded. This means that the document will be approved even if other translation reviews are ongoing.
-
Use the drop-down to choose what should happen when the review is finished:
-
My documents don't need to be translated
Choose this option if you want your content to automatically switch to "Work in Progress" or "Released" at the end of a review (depending on whether the content "needs work" or is "approved").
This option removes the "In Translation" and "In Translation" stages from the production workflow.
-
Assume that my documents are translated
Choose this option if you want your content to automatically switch to "Work in Progress" or "In Translation" at the end of a review (depending on whether the content "needs work" or is "approved").
Tip
Use the When is the assignment finished? and Assignee groups settings to control how Paligo recognizes a review is complete, see Define When Review Assignments End.
To change the state of the content at the start of a review, see Automatic Status Change.
-
-
Select OK to confirm your choices.
When you create an assignment, some of the topics needed for that assignment may be checked out by other users. This can be a problem, as it means the assignees may not be able to access the content they need to work on. To avoid this, you can set Paligo to automatically check in the content needed for an assignment.
-
Use one of the two ways to access the Default Settings:
-
Planner - Make general assignment settings. Before you start working with assignments, it is a good idea to review the default settings as you can use them to make your workflow more efficient.
-
Create Assignments - Adjust the default settings when the assignment is created.
-
-
Select the General tab.
-
Use the Check in documents box to control if related and reused documents are to be checked in when the assignment begins:
-
Check the box to set Paligo to automatically check in all related and reused documents when the assignment begins.
-
Clear the box if you do not want to check in documents. They may be checked out and unavailable to the assignee(s).
-
-
Select OK to confirm your choices.
Paligo can automatically send email notifications to assignees to let them know they have an assignment. This is a good way to make assignees aware of their assignment duties, especially if they do not use Paligo for other work.
You can also set Paligo to send an email to the creator of an assignment.
-
Use one of the two ways to access the Default Settings:
-
Planner - Make general assignment settings. Before you start working with assignments, it is a good idea to review the default settings as you can use them to make your workflow more efficient.
-
Create Assignments - Adjust the default settings when the assignment is created.
-
-
Select the General tab.
-
Use the Send email to all assignees box to control notification emails:
-
Check the box to automatically send notification emails.
-
Clear the box to not send notification emails to assignees.
-
-
Use the Send iCal invitations box to control calendar invitations:
-
Check the box to automatically include an iCal calendar invitation with the notification email.
-
Clear the box to not include calendar invitations.
This option is only available if you have checked the Send email to all assignees box.
-
-
Use the Notify me box to control if an email is sent to the creator of an assignment when the assignment begins:
-
Check the box to automatically send a notification email to the creator of an assignment.
-
Clear the box to not send notification emails to the creator of an assignment.
-
-
Select OK to confirm your choices.
Tip
To set Paligo to send an email reminder to assignees who have not responded, check the Send a reminder to assignees box. The reminder is sent a day before the end assignment date.
This feature only applies for assignments that have a duration of more than 2 days.
You can set Paligo to send reminders to unresponsive assignees. The reminder can be a useful prompt to assignees who may have not noticed the assignment or delayed working on it for some reason.
The reminder is sent as an email one day before the end of the assignment deadline.
Note
This feature is only used for assignments with a duration of longer than two days.
-
Use one of the two ways to access the Default Settings:
-
Planner - Make general assignment settings. Before you start working with assignments, it is a good idea to review the default settings as you can use them to make your workflow more efficient.
-
Create Assignments - Adjust the default settings when the assignment is created.
-
-
Select the General tab.
-
Use the Send a reminder to assignees box to control reminder emails:
-
Check the box to automatically send reminder emails.
-
Clear the box to not send reminder emails.
-
-
Select OK to confirm your choices.
It is possible to make Paligo automatically create a snapshot at the start of a contribution assignment.
A snapshot is an archived version of the content at a particular point in time. During a release a snapshot is always created but can also be created by a contributor during an assignment or manually created at any time. The snapshots are useful when comparing the content between different versions or for restoring lost content. By comparing a snapshot from before and after an assignment, it is easy to visualize the changes made to the documentation.
Note
To find out more about contribution assignment snapshots, see Compare Contributions.
To set Paligo to create a snapshot automatically at the start of a contribution assignment:
-
Use one of the two ways to access the Default Settings:
-
Planner - Make general assignment settings. Before you start working with assignments, it is a good idea to review the default settings as you can use them to make your workflow more efficient.
-
Create Assignments - Adjust the default settings when the assignment is created.
-
-
Select the Contributions tab.

-
Use the Create a snapshot box to control if snapshots are to be created when the assignment starts:
-
Check the box to automatically create a snapshot when an assignment begins.
-
Clear the box to not create snapshots when new assignments begins.
-
-
Select OK to confirm your choices.
When contributors start working on an assignment, Paligo can show them the changes that have occurred since the last snapshot was taken.
-
Use one of the two ways to access the Default Settings:
-
Planner - Make general assignment settings. Before you start working with assignments, it is a good idea to review the default settings as you can use them to make your workflow more efficient.
-
Create Assignments - Adjust the default settings when the assignment is created.
-
-
Select the Contributions tab.
-
Clear the box Create a snapshot to avoid a new snapshot replacing the existing snapshot.
If this box is checked, Paligo creates a new snapshot when the assignment is opened. As a result, the comparison feature would compare the latest version of the content to that snapshot, and the content would be the same.
-
Use the Enable change preview box to control if a side-by-side comparison should be shown:
-
Check the box to show a side-by-side comparison of the latest version of the content and the most recent snapshot of the content. The contributor can choose to compare to different versions, see Compare Contributions.
-
Clear the checkbox if you want to turn off the comparison.
-
-
Select OK to confirm your choices.
By default, assignments are set to end on their due date, but you can change this so that assignments only end when assignees respond to them. You will need to decide which is the best approach for your organization.
-
Use one of the two ways to access the Default Settings:
-
Planner - Make general assignment settings. Before you start working with assignments, it is a good idea to review the default settings as you can use them to make your workflow more efficient.
-
Create Assignments - Adjust the default settings when the assignment is created.
-
-
Select the General tab.
-
Use the Finish assignment on due date checkbox to define when assignments end by default.
-
Check the box to set assignments to end on their due date (deadline) even if assignees have not responded.
-
Clear the box to set assignments to remain open after the due date (deadline) if assignees have not finished the assignment, either by setting it to Needs more work or Approved.
-
-
Select OK to confirm your choices.
By default, each assignment ends on the due date that was set for that assignment. This also applies to review assignments, but these also have extra options for controlling what happens when assignees complete an assignment.
Depending on your choices, Paligo will recognize a review assignment has finished when:
-
All assignees have approved the content
-
All assignees have responded to the assignment
-
All members of a user group have responded to the assignment
-
At least one member of a user group has responded to the assignment.
Note
It is possible to change the default settings so that assignments do not end automatically when the due date is reached (see Define When Assignments End).
To control when review assignments finish:
-
Use one of the two ways to access the Default Settings:
-
Planner - Make general assignment settings. Before you start working with assignments, it is a good idea to review the default settings as you can use them to make your workflow more efficient.
-
Create Assignments - Adjust the default settings when the assignment is created.
-
-
Select the Review assignments tab.
-
Use the When is the assignment finished? section to define when an assignment is finished:
-
All assignees have approved - All assignees must have completed the assignment and set the content to "approved".
-
All assignees have responded - All assignees must have completed the assignment, but they can have set the content to "Needs Work" or "Approved".
-
-
Use the Assignee Groups section, to define what must be in place to recognize that a user group has finished an assignment:
-
All members have responded - If an assignment is allocated to a user group, it can only be recognized as finished if all of the members of that user group have responded. To respond, they must set the assignment to finished with either "Needs Work" or "Approved" status for the content.
-
One member has responded - If an assignment is allocated to a user group, it can only be recognized as finished one or more members of the user group have responded.
Note
You can send a user two separate invites to the same assignment, by inviting a user group and also inviting them as an individual user. In this scenario, they only need to respond once. Paligo automatically detects that their response applies to both the user's assignment and the user group's assignment.
-
-
Select OK to confirm your choices.
It is possible to allocate an assignment to a user group and also some individual users at the same time. This can result in some more complex scenarios, covered in the following examples.
Let's say you have the following settings for review assignments in place:
-
When is assignment finished? - All assignees have approved
-
Assignee groups - One member has responded
You then create a review assignment and allocate it to a user group plus two individual users who are not part of that group.
The two individual users read the content and approve it. Their assignment work is complete, with the content set to "approved". But the assignment is still open, as the default settings require all assignees to approve the content and the user group is an assignee.
A member of the user group reads the content and sets it to "needs work".
The assignment remains open. This is because all assignees have responded, but one of them did not approve the content:
-
Individual user 1 approved the content
-
Individual user 2 approved the content
-
User group - one user from the group set the content to "needs work", and so the content cannot have "approved" status from the user group. As a result, the "All assignees have approved" rule is not met, and so the assignment remains open.
Let's say you have the following settings for review assignments in place:
-
When is assignment finished? - All assignees have approved
-
Assignee groups - One member has responded
You then create a review assignment and allocate it to a user group plus two individual users who are not part of that group.
The two individual users read the content and approve it. Their assignment work is complete, with the content set to "approved". But the assignment is still open, as the default settings require all assignees to approve the content and the user group is an assignee.
A member of the user group reads the content and sets it to "approved".
The assignment finishes as the finishing criteria has been met:
-
Individual user 1 approved the content
-
Individual user 2 approved the content
-
User group - one user from the group set the content to "approved".
The individual users both responded with approved, and a user group member responded with approved too. So all assignees have approved. It does not matter that the other user group members did not look at the content, as the Assignee groups setting required only one user group member to respond.
If any of the user group members had responded with "needs work" first, the assignment would have remained open.
The administrator can control whether contributors and reviewers can access unassigned content with the setting called Access to documents for contributors and reviewers. This setting is activated by default to prevent access outside the assignment.
Tip
Permissions is another way to restrict user access.
-
Log in to Paligo via a user account that has administrator permissions.
-
Select the avatar in the top-right corner.

-
Select Settings from the menu.

-
Select the System Settings tab.

-
Control whether the assignee should be able to access unassigned content or not:
-
Activate to restrict the assignee to only access content within the assignment.
-
Assignments created from a fork or publication allow the assignee access to content within that publication.
-
Assignments created from a topic restrict the assignee to that topic.
-
-
Deactivate to allow the assignee to access content outside the assignment.
Permissions and User Types controls what the assignee will be able to access within the Documents folder.

-
Contributors can create new topics as part of their work on an assignment. By default, Paligo will store these new topics in a special folder called "Contributions, <name of user>" and this is in the root of the Documents section in the Content Manager. But you can set Paligo to store new contribution topics elsewhere if preferred.
 |
To change the location for new contributor topics:
-
Use one of the two ways to access the Default Settings:
-
Planner - Make general assignment settings. Before you start working with assignments, it is a good idea to review the default settings as you can use them to make your workflow more efficient.
-
Create Assignments - Adjust the default settings when the assignment is created.
-
-
Select the Contributions tab.
-
In the Where to save new topics section, use the browse field to choose the folder for new contributor topics. When a contributor creates a new topic, it will be saved in a special folder called "Contributions, <name of user>" and that will be inside your chosen folder.
-
Select OK to confirm your choices.
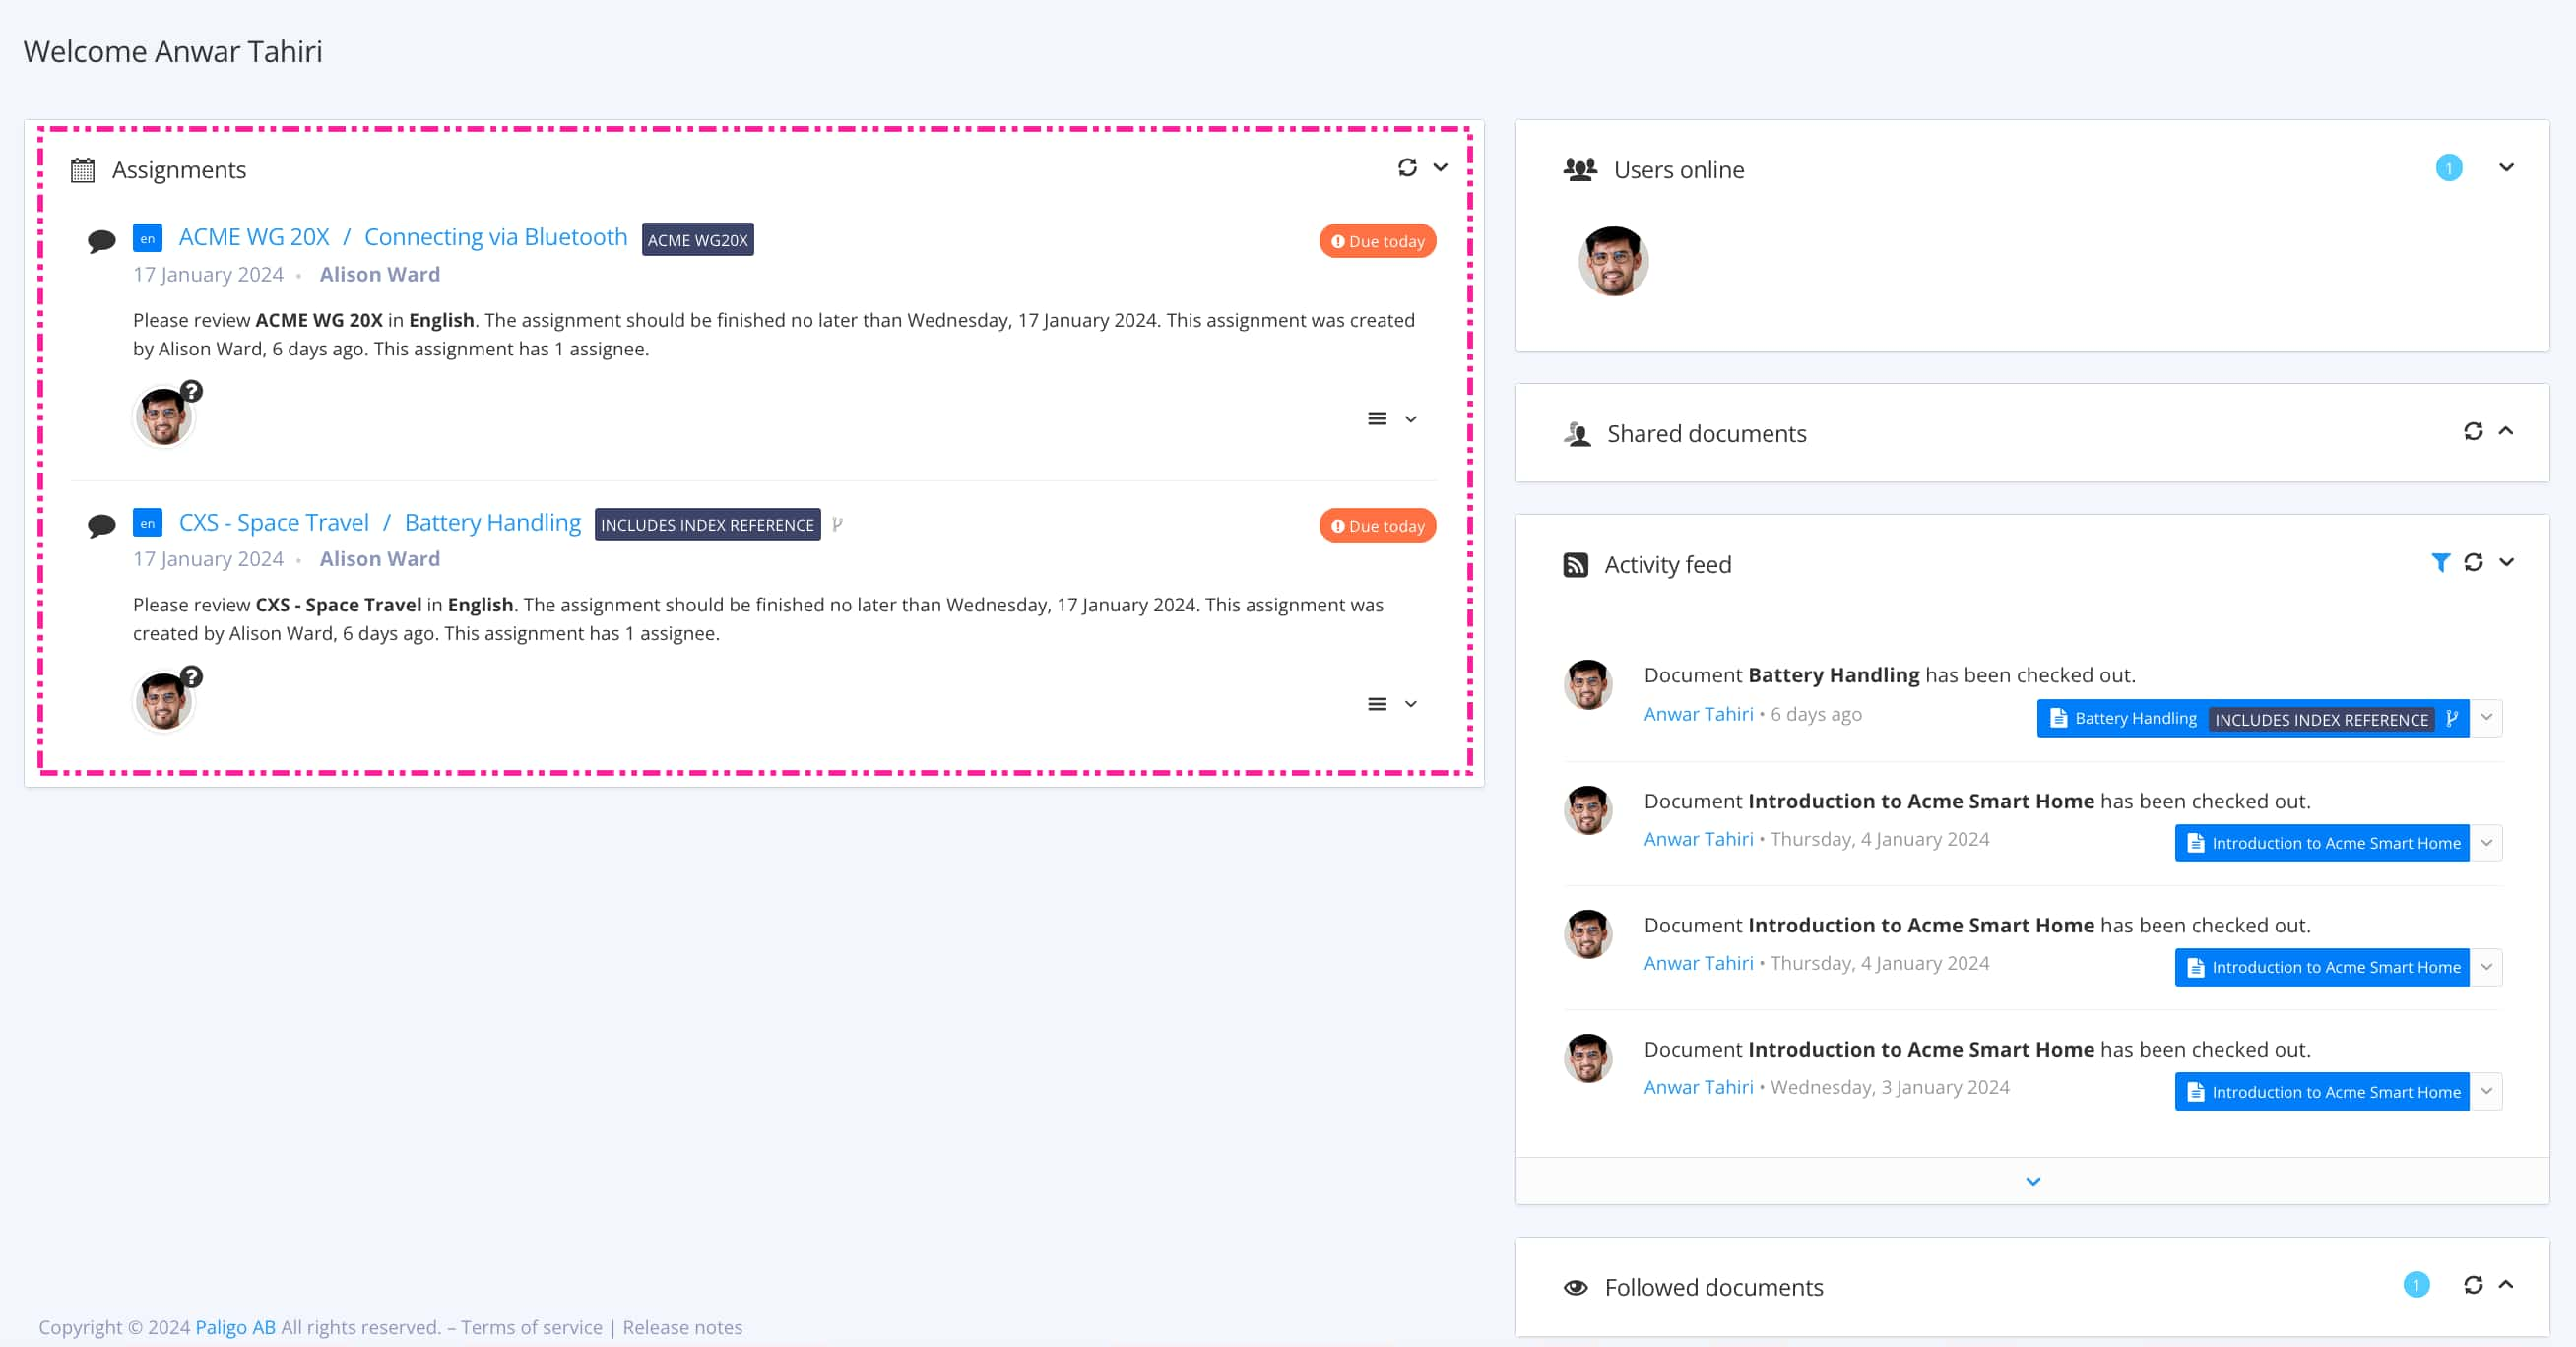
Assignments are an important part of the workflow if you want to track your content in Paligo. When you create an assignment, you choose what type of assignment it is, who should work on it, and the timescale for the work. This is all tracked by Paligo and you can view the progress of an assignment on the Dashboard and in the Planner.
To create assignments, use the Planner or the Content Manager. It does not matter which display you use to create an assignment, the result is the same. You can Track the Assignment Progress via the Planner and Assignments Panel.
 |
Tip
When you create an assignment, Paligo sends the assignee an email. You can also send them a link to the assignment via Slack, Teams, or other messaging systems.
To send a link, create an assignment. Paligo then displays a notification message. Select the Copy link button in the notification and then paste the link into a message.
 |
Use the Content Manager to create assignments for reviews, contributions, translations and translation reviews. Alternatively, Create Assignments in Planner.
You can create assignments from a publication, topic or fork depending on what you want the assignee to have access to.
-
 Publication assignments provide access to the publication. In the Assignments Panel there will be a link to the publication.
 -
 Fork assignments provide access to the fork and read-only access to its publication. In the Assignments Panel there will be a link to the fork. To
create a fork assignment, expand the publication and create the assignment from one of the forks inside the publication.
Fork assignments provide access to the fork and read-only access to its publication. In the Assignments Panel there will be a link to the fork. To
create a fork assignment, expand the publication and create the assignment from one of the forks inside the publication.However, if a fork is shared instead of assigned, only the topic will be shared without access to its publication. Shared content appears in the Shared Documents Panel.
-
 Topic assignments only provide access to the topic. In the Assignments Panel there will be a link to the topic.
 |
1 = Publication Assignment, 2 = Fork Assignment, 3 = Topic Assignment
Important
You cannot give a user a contribution assignment for content that they do not have permission to edit.
Paligo will prompt you to allocate suitable permission to the user. This applies to instances that use Paligo's Permissions feature, which is available on the Enterprise plan. To upgrade your plan, contact your Paligo account manager.
Document Access is another way to restrict user access.
Tip
To locate a fork's origin, use its dotted menu (...) and select Show Origin.  Paligo will then
highlight the topic in the Contributor Editor.
Paligo will then
highlight the topic in the Contributor Editor.
 |
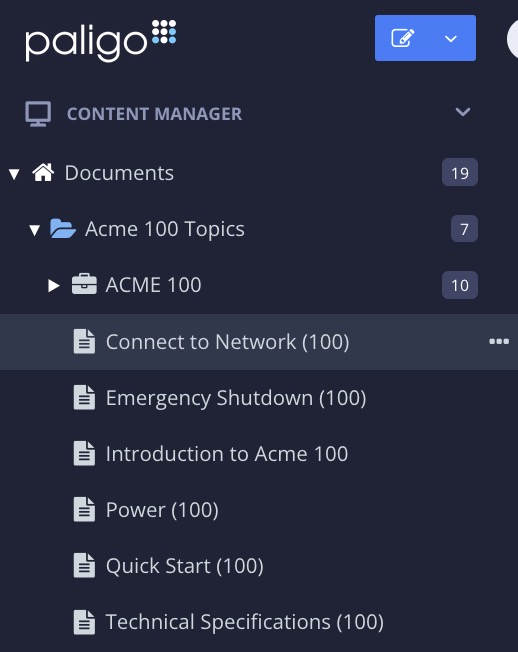
To create an assignment from the Content Manager:
-
Locate the publication, fork or topic in the Content Manager.
-
Select its dotted menu (...) and choose Create assignment.


-
Select an Assignment type:
-
Review is for when you want somebody to proofread the content and add comments.
-
Contribution is when you want a colleague to add or improve content.
-
Translation to create translation jobs and assign them to internal translators.
-
Translation review to review the translations and accept or reject them.

The assignment dialog changes depending on selected assignment type.
-
-
Select the content that you want the assignee(s) to work on.

If the assignment is generated from the content's dotted menu (...), the content is automatically chosen for the assignment. But you can choose different content if you prefer.
-
Select a language for the assignment. You can only choose one language per assignment.
Note
For Translation Assignments, choose the language that you want the translator to provide.
-
Apply a favorite profile to the publication or topic.

Note
You only see options here if you have set up favorite profile settings for the document.
-
In the Assignees section, select one or more users or user groups (or a combination of both) to work on this assignment.

For user groups, the assignment is allocated to every group member of the selected user group(s).
-
In the Assignment date section, use the calendars to set the Start date and End date.
-
Check the box Let me leave a message if you want to enter a message to the assignee(s). A field appears and you can enter your message.
Clear the box if you don't want to add a message.
-
Select the Default Settings button (in the lower left corner) to check the Assignment Settings.
-
Select OK to save any changes to the Default Settings. Close the dialog with the
 icon in the upper-right corner.
 -
Select OK to create the assignment.
-
The assignee will receive an email with a link that takes them to the content and the assignment will also show in the Assignments Panel.
-
As the assignment creator, you will also receive an email to confirm that the assignment has started and been finished. You can Track Assignments via the Dashboard and Track Assignments via the Planner.
-
Use the Planner to create assignments for reviews, contributions, translations and translation reviews. Alternatively, Create Assignments in Content Manager.
You can create assignments from a publication, topic or fork depending on what you want the assignee to have access to.
-
Publication assignments provide access to the publication. In the Assignments Panel there will be a link to the publication.
-
Fork assignments provide access to the fork and read-only access to its publication. In the Assignments Panel there will be a link to the fork. To
create a fork assignment, expand the publication and create the assignment from one of the forks inside the publication.
However, if a fork is shared instead of assigned, only the topic will be shared without access to its publication. Shared content appears in the Shared Documents Panel.
-
Topic assignments only provide access to the topic. In the Assignments Panel there will be a link to the topic.
|
1 = Publication Assignment, 2 = Fork Assignment, 3 = Topic Assignment
Important
You cannot give a user a contribution assignment for content that they do not have permission to edit.
Paligo will prompt you to allocate suitable permission to the user. This applies to instances that use Paligo's Permissions feature, which is available on the Enterprise plan. To upgrade your plan, contact your Paligo account manager.
Document Access is another way to restrict user access.
Tip
To locate a fork's origin, use its dotted menu (...) and select Show Origin. Paligo will then
highlight the topic in the Contributor Editor.
|
To create an assignment in the Planner:
-
Select Planner in the top menu.

-
Either:
-
Select the Create button and then choose the type of assignment you want to create.

-
Select the starting date for the assignment directly on the calendar widget.

To change the timescale for the assignment on the Planner, drag it to another date on the calendar.
-
-
Select an Assignment type:
-
Review is for when you want somebody to proofread the content and add comments.
-
Contribution is when you want a colleague to add or improve content.
-
Translation to create translation jobs and assign them to internal translators.
-
Translation review to review the translations and accept or reject them.
The assignment dialog changes depending on selected assignment type.
-
-
Select the content that you want the assignee(s) to work on.
If the assignment is generated from the content's dotted menu (...), the content is automatically chosen for the assignment. But you can choose different content if you prefer.
-
Select a language for the assignment. You can only choose one language per assignment.
Note
For Translation Assignments, choose the language that you want the translator to provide.
-
Apply a favorite profile to the publication or topic.
Note
You only see options here if you have set up favorite profile settings for the document.
-
In the Assignees section, select one or more users or user groups (or a combination of both) to work on this assignment.
For user groups, the assignment is allocated to every group member of the selected user group(s).
-
In the Assignment date section, use the calendars to set the Start date and End date.
-
Check the box Let me leave a message if you want to enter a message to the assignee(s). A field appears and you can enter your message.
Clear the box if you don't want to add a message.
-
Select the Default Settings button (in the lower left corner) to check the Assignment Settings.
-
Select OK to save any changes to the Default Settings. Close the dialog with the
icon in the upper-right corner. -
Select OK to create the assignment.
-
The assignee will receive an email with a link that takes them to the content and the assignment will also show in the Assignments Panel.
-
As the assignment creator, you will also receive an email to confirm that the assignment has started and been finished. You can Track Assignments via the Dashboard and Track Assignments via the Planner.
-
When reviewers and contributors add comments to content, those comments are stored in the relevant topic, see Open an Assignment that "Needs Work". As a Paligo author, you can view the comments:
-
When you open the topics in the main Editor.
-
In Review View or Edit View.
To view the feedback comments in the main Editor:
-
Select a feedback comment (1). Any content that has a comment is highlighted in yellow.

1 = Highlighted content 2 = Show comments 3 = Comments.
-
Select the Show comments (2) to open the comments dialog and show the feedback comment (3) for selected content.
If you select another highlighted part, the comments dialog updates to show the comments for that content instead.

The number next to the comment icon shows the number of comments that have not been dealt with.
Tip
You can display the Comments sidebar to see all comments at the same time, by selecting the Distraction free mode. It hides the Content Manager.

Return to normal by clicking it once more.
-
Use the comments dialog to respond to any existing comments.
Status to change the status of the comment to:
-
Done if you have resolved the issue.
-
Rejected if you disagree with the point being made and are not going to make any changes.
-
Mark as read if you want the reviewer to know you have seen the comment, but you have not yet made changes or rejected it.
-
Unset status to remove the current state.
Alternatively, select the settings icon in the bottom corner and you can set the status for all of the comments in the conversation.
-
 Add to add a reply to a comment.
 -
 Archive to remove old comments, but keep a record of them.
 -
 Restore to recover old archived comments.
Tip
You can mention other users in your comments and Paligo will send them a notification message. Enter @ followed by the first characters of their name. Paligo then displays a list and you can select the user from the list.

-
When a Paligo author creates an assignment the assignee receives an email invite to review, translate or contribute to the documentation.
The Assignment Types and User Types determine which view is opened, see Review View Features, Edit View Features and Translation View.
Note
If the content uses Filtering / Profiling or Variables, the author should have created a favorite profile and provided you with information about which profile to use, see Choose Profile Settings and Favorite Profiles.
An assignment can be opened in different ways:
-
Select the link in the email invite.
-
Select the assignment in the Assignments Panel.
-
As an author or admin, you can also Open Assignment in Main Editor.
When you are viewing content or sending content to reviewers or contributors, you may want certain filters and variables to be in place. For example, if a topic contains information about several products but your reviewer only knows about one product, you might want to filter out the content about other products. Rather than set up the filters and variables separately each time, you can set them up once and store them as a favorite profile. You can then apply the favorite profile when you view the topic or send it in an assignment.
Favorite profiles are associated with the content they were created for. You cannot create a profile for one topic and then use the same profile on a different topic. You can create a favorite profile from the Preview tab and also from the Review View. No matter where you create your favorite profiles, they are visible in both views.
To be able to make Favorite Profiles, you need to:
-
Be an author or administrator, see User Types
-
Set up the Filtering / Profiling
-
Insert a Variable in your content.
Note
When you create an assignment, include a message to tell the assignee which Favorite Profile to use. This makes it easier for assignees as they can choose the favorite to display the content that is relevant to them, without having to understand how variables and filters work, see Choose Profile Settings.
Instead of having to set up the profiling and variables each time, you can select the Favorites tab and choose the profile you want, and select Apply. To stop applying a profile, select Reset.
The favorite profiles can be accessed from the Profile settings option under the preview tab and in Review View.
Note
Favorite profiles are associated with the content they were created for. You cannot create a profile for one topic and then use the same profile for a different topic.
-
Select the topic or component in the Content Manager to open it in the Editor.
Alternatively, you can Create a Topic and edit that.
-
Select the Preview tab in the Toolbar.

-
Select Profile settings.
-
Select the Favorites tab.
-
Select New to create a favorite profile


-
Enter a name for the favorite profile.

-
Select OK.
-
Select your new favorite profile in the Favorites tab.
-
Select the Variables tab.
-
Select the variables and variants you want Paligo to show.

-
Select the Profiling tab.
-
Choose the filter types and filter values that you want Paligo to apply.

Content that has the selected filter type and value will be included. If the value is different than selected the content is excluded. If there is content without filtering, it will be included.
-
Select the Favorites tab.
-
Make sure your favorite profile is still selected (its name is in bold when selected).

-
Select Update in the lower-left corner.
-
Select Apply.
-
Repeat this process to create other favorite profiles for the topic (and other topics as required).
If your content contains filters or variables, define the profile settings before you create an assignment and save them as a Favorite profile. The profile settings let you choose the variable set, variants, and filters that will be in place when the assignee opens the content.
When you send the assignment, include a message that tells the assignee what favorite profile to use.
 |
Note
Favorite profiles are associated with the content they were created for. You cannot create a profile for one topic and then use the same profile on a different topic
-
Select the dotted menu (...) for the publication in the Content Manager and choose Edit and Review.
Tip
For an individual topic instead of a publication, expand the publication and select the dotted menu ( ... ) for the fork that references the topic, then select Edit and choose Review.
-
Select Settings.
-
Select Profile settings.
-
Select the Favorites tab.
-
Select New to create a favorite profile
-
Enter a name for the favorite profile.
-
Select OK.
-
Select your new favorite profile in the Favorites tab.
-
Select the Variables tab.
-
Select the variables and variants you want Paligo to show.
-
Select the Profiling tab.
-
Choose the filter types and filter values that you want Paligo to apply.
Content that has the selected filter type and value will be included. If the value is different than selected the content is excluded. If there is content without filtering, it will be included.
-
Select the Favorites tab.
-
Make sure your favorite profile is still selected (its name is in bold when selected).
-
Select Update in the lower-left corner.
-
Select Apply.
-
Repeat this process to create other favorite profiles for the topic (and other topics as required).
Let's say you have an introduction topic that is reused in the user guide for two different products (we'll call them Acme 100 and Acme 200). That topic uses variables for the product names and has a note that only applies to the Acme 200 version of the product. So that note has a filter so that it can be excluded when it is not needed.
The topic looks like this:

Where:
-
1 is the product variables that are used to swap out the product name, depending on whether the content is for the Acme 100 or Acme 200
-
2 is the note that only applies to the Acme 200. This note has an
xinfo:productfilter with a filter value of Acme 200.
You want to set up favorite profiles so that you can easily switch between the content for the Acme 100 and the content for the Acme 200.
You go into the profile settings and create a new favorite called Acme 100.
 |
On the Variables tab, you set the Acme Products variable to use the Acme 100 variant.
 |
On the Profiling tab, you set the Product filter to use a value of Acme 100.
 |
You then go back to the Favorites tab, make sure your Acme 100 favorite is selected, and then select Update.
Next, you select Reset so that no profiling is applied to your content. You then select New and create a new favorite profile for Acme 200. You repeat the steps for setting up the profile, only this time, you set the variables and profiling to use Acme 200.
The topic now has two favorite profiles in place.
 |
You create a new review assignment for the topic and in the assignment settings, there is a profiling option. There, you can choose to apply any of the favorite profiles that are associated with your content. You choose Acme 100 and send the review assignment.
 |
When the reviewer receives the assignment, they see it with the Acme 100 profiling applied to it, so the variables show "Acme 100" and the note is excluded from the content (as it has a filter to only appear for the Acme 200 product).
 |
If you have a favorite profile that you use for both previews and assignments, you can set it to be your default value, meaning that you no longer need to make any settings or even select between favorites.
-
Select the topic or component in the Content Manager to open it in the Editor.
Alternatively, you can Create a Topic and edit that.
-
Select the Preview tab in the Toolbar.
-
Select Profile settings.
-
Select the Favorite tab.
-
Select the Dotted menu (...) to the right of the favorite.

-
Select Set as default.
When an assignment is finished, Paligo sends an email to notify the assignment's creator. The assignment is updated in Planner and moved to the Done tab in the Assignments Panel on the dashboard. If the assignment is finished, but the content is marked as "needs work", the author opens the assignment and corrects the content according to the review comments.
Depending on the Assignment Types and the feedback provided, this could mean adding more content, changing the existing content, or applying the correct structure and content reuse.
Note
You can open the assignment content at any time, but in the usual workflow, an author would only open the content when the assignment is finished (or cannot finish as there is content that has the "needs work" state).
Review View is the display that reviewers see when they work on review assignments. It shows the content in the main panel and comments in a sidebar on the right. To find out about review assignments, see Working in Review View.
Once the assignee has finished the assignment, an email notification is sent to the author.
 |
The finished assignment that needs work can be opened in two ways:
-
From the link in the email notification.
-
By selecting the finished Review assignment under the Done tab, in the Assignments Panel.
The assignment is listed in the For You, By You, or Done tabs, depending on whether it is allocated to you, created by you or has been completed.
Note
Paligo authors can open the content in the full Paligo editor and view feedback and changes there, see Open Assignment in Main Editor.
Initially, the contributor enters Review View and has to activate Edit View to work on the assignment. The Contributor Editor Toolbar provides editing and adding content features. To learn more, see Working in Edit View.
Once the assignee has finished the assignment, Paligo sends an email to notify the assignment's creator. If there are any invalid changes, these will be listed, stating the document name and error type.
After a contribution assignment, it is a good idea to use the validation features in the full Editor to check the structure of the content is valid, see Validation.
|
The finished assignment that needs work can be opened in two ways:
-
From the link in the email notification.
-
By selecting the finished Contribution assignment under the Done tab, in the Assignments Panel.
The assignment is listed in the For You, By You, or Done tabs, depending on whether it is allocated to you, created by you or has been completed.
Note
Paligo authors can open the content in the full Paligo editor and view feedback and changes there, see Open Assignment in Main Editor.
As an Author or Admin, you can access the assignments in the main Editor to view feedback comments, review, edit or translate content, see Comments in the Main Editor.
After a contribution assignment, it is a good idea to use the validation features in the full Editor to check the structure of the content is valid, see Validation.
-
Select the Dotted Menu (...) for the topic in Content Manager

-
Select Edit and choose Review, Contribute or Translate to open the assignment.
OR
-
Open the content in Review View or Edit View and then select the Open topic in editor.


If an assignment has content that has been marked as "needs work", open the content and review the feedback comments. Based on the feedback, you can then make changes to the content, if required, respond to the comments, and set the comment status.
-
Open the content for the assignment. As an author, you can make changes to the content in the full editor or the edit mode (contributor).
-
View the comments in the comments dialog or the side bar. The comments dialog is only available in the full editor.
-
To reply to a comment, select Add comment and enter your message.
-
When you have taken care of an issue, you can set the status:
-
To set the status of an individual comment, select the comment message to display a status menu.

-
To set the status of an entire conversation, select the
 icon in the bottom corner to display a status menu.
Select:
-
Done if you have resolved the issue.
-
Rejected if you disagree with the point being made and are not going to make any changes.
-
Mark as read if you want the reviewer to know you have seen the comment, but you have not yet made changes or rejected it.
-
Unset status to remove the current state.
-
-
When you have dealt with all of the feedback, either Reassign an Assignment, Refresh an Assignment, or Create Assignments to get the changes checked. You can only reassign if you created the original assignment.
In certain circumstances, you may need to reassign an assignment, so that reviewers, contributors, or translators can take another look at the content. Some common reasons for reassigning content are:
-
A reviewer completed a review assignment and set the content as "Needs work". You have now changed the content based on the feedback and need your changes to be reviewed.
-
A contributor made changes and you have had to alter them and need your changes to be approved.
-
A translator declined a translation assignment as they did not have time to work on the translation.
-
An assignment ended and the assignee did not respond. This could happen if an assignee has had other priorities or perhaps they have left the organization before they finished the assignment.
To reassign an assignment:
-
Select Dashboard in the top menu.

-
Find the assignment in the Assignments Panel.
-
Select the Settings icon in the bottom corner and choose Reassign.

Note
For Paligo administrators and authors, the Assignments section has tabs. You will find assignments that you created and need to reassign in the By You tab or the Done tab.
-
Use the Reassign dialog to allocate the assignment to one or more users and/or user groups and to set the timescale.

-
Select OK.
When you reassign, the recipient will receive an email inviting them to join the assignment. They will then provide feedback. If they reject the content, you will need to make changes and then reassign an updated version until the reviewer accepts the content. If the content is accepted, it is ready for translation or publication.
If an assignee finishes an assignment and sets the content to "Needs work", you will need to address the problems with the content.
When you have done that, you will need to get the changes reviewed. An easy way to do this is to "Refresh" the original assignment, as this resets the status and sends the assignee a reminder to check the content again.
Note
The Refresh option is only available if you set review assignments to complete when all assignees have approved. This is an option in the Default Settings for assignments, see Define When Review Assignments End.
To refresh an assignment:
-
Select Dashboard in the top menu.
-
Select the assignment in the Assignments Panel.
The Assignment Types control which view opens up.
Tip
For alternative ways to open an assignment, see Different Ways to Open Assignments.
-
Select the Settings icon in the bottom corner, and choose Refresh.

-
Paligo clears the status for the content in the assignment. It is no longer set as "Needs Work".
-
Paligo also sends a reminder to those assignees who previously set it to "Needs Work", asking them to re-check the content. Hopefully, they now find the content correct and set to "Approved". When the content is approved, it is ready for translation or publication.
-
You can track the progress of an assignment via the Planner and the Dashboard. If you have enabled email notifications in the Assignment Settings, you will receive emails when an assignment starts and ends.
The assignments are color-coded in the Planner:
-
Blue blocks for started translation and translation review assignments.
-
Purple blocks for started review assignments.
-
Gray blocks for started contribution assignments.
-
Semi-transparent blocks for finished assignments (either as approved or needs more work)
-
Clear / gray outline blocks for draft assignments. These are set to begin in the future and will switch to started on the start date.
 |
The assignments are color-coded in the Assignments Panel:
-
Drafts are shown as grayed out entries with the line "The assignment is still a draft and has therefore not started yet."
-
Started are shown in color and include information about when the assignment's deadline. You can see assignments allocated to you on the For you tab and assignments you allocated to other users on the By you tab.
-
Finished are shown in color in the Done tab. This is where you can find assignments that are finished and the content is approved and also assignments that are finished but the content needs more work.
 |
Tip
To learn more about each state in the workflow, see Assignment Workflow and States.
The Planner is a built-in project planning tool, much like a Gantt chart for planning your technical documentation assignments. It is a convenient view for creating assignments and monitoring them. The Planner has two sections that contain information about your assignments: the Assignment planner and the Workload summary.
-
Select Planner in the top menu.
-

-
Filter settings to limit the information shown. Select assignment type, assignee, language and status.
-
Time period selector to adjust the time range for the information shown.
Important
Specify a date range that returns a maximum of 250 to 500 assignments. More than that may negatively impact the page load and planner performance.
-
Assignment Tools - Create or delete assignments.
-
Options to enlarge the table view, show today in the table and access the Assignment Settings.
-
List of topics or publications included in assignments.
-
Calendar / Gantt view showing the assignments, their timescales, assignees and status. Hovering over an assignment will show a popover with an assignment summary.
-
Workload widgets showing the amount of assignments allocated to each user. They are organized by assignment type.
-
Your Dashboard is displayed when you first log in to Paligo and it contains a summary of the activity in your Paligo instance. It also contains information about assignments.
To display the Dashboard:
-
Select Dashboard in the top menu.
-
Two places on your dashboard show assignment information:
-

-
The Assignments Panel. For an assignee it only shows your unfinished assignments. But, if you are an author, it will all show all available assignments divided in three tabs:

Assignments that are assigned to you are shown in the For You tab.

Assignments that you created are shown in the By You tab.

Assignments that have been completed are shown in the Done tab. All completed assignments appear here, including those that require the writer to do more work on the content (the assignment is complete but the content is not approved).
-
There are several ways to change the status of an assignment, depending on your user permissions. It is necessary to end an assignment by changing status, otherwise, the author will not receive a notification that you are done with your assignment.
There is an avatar for each assignee, and it has an icon to show the assignee's response.
|
|
Question mark |
The assignee has not responded yet. To be able to remove a former status, choose Reset my status. |
|
|
Green checkmark |
The assignee has finished the assignment and set the content to Approved. Set the status to Update to approved. |
|
|
Red Minus symbol |
The assignee has finished the assignment and set the content to Needs work. Set the status Update to needs work. For translation assignments, "Needs work" is replaced by "Declined". |
Usually, you would go into the assignment content to set the status. But you can also set the status from the Assignments Panel on the Dashboard.
-
Select the Dashboard tab from the top menu.
-
Select the Menu icon in the bottom-right corner of the Assignments Panel.

-
Choose Update to approved, Update to needs work or Reset my status.

To be able to reach Planner, you need to have to be an author or administrator.
-
Select Planner in the top menu.
-
Drag assignments in the planner to change their status:
-
Draft assignments to the current date or before to change it to Started.
-
Started assignments into the future to change their state to Draft.

-
When working on an assignment, you can change the status inside the Contributor Editor.
-
Select the assignment in the Assignments Panel.
The Assignment Types control which view opens up.
Tip
For alternative ways to open an assignment, see Different Ways to Open Assignments.
-
Select the Assignment button.


-
Select a Status for the reviewed content (Approved, Needs work or Reset status).
The assignment is finished and the author receives a notification that you are done.
A "fork" is a special type of link between a publication and its content. This means that it's not the topic or subpublication itself, but a reference (link) that is used in a publication. Learn more, see Forks.
 |
-
Fork, only a reference (link) to the actual topic
-
Actual origin topic, where you write your content